Tag Archive: Meat

  1. Côte de boeuf with herb butter

    Comments Off on Côte de boeuf with herb butter

    Some say the Six Nations Championship is without a doubt the world’s greatest rugby tournament. Every year the fans of these six nations – England, France, Ireland, Italy, Scotland and Wales – partake in the thrill and excitement of this pageant of world class rugby.

    ProWare's Cote-de-boeuf-prep

    To get in the spirit of the tournament we’ve created a dish for each match based on England’s opponent so you’ve got a new recipe to devour each weekend. On Saturday the England Rugby Squad take on France at Twickenham Stadium in the first match of their Six Nations fixture. To start our collection of recipes off we’ve selected this indulgent Côte de boeuf. Côte de boeuf is a simple dish which is full of flavour and bound to impress your guests. We’ve used a 30 day dry aged Hereford Côte de boeuf which is available at Waitrose or Ocado though you should be able to find this bone in beef cut at a butcher too.

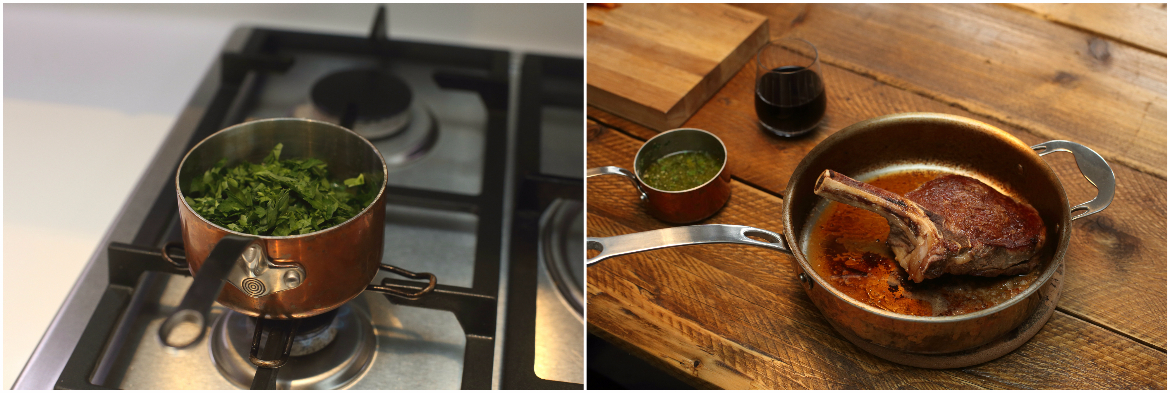
    Our Copper Tri-ply Sauté Pan is the perfect pan for this recipe.  The copper exterior heats up so quickly and the aluminium interior holds the heat efficiently without hot spots making this pan ideal for searing the beef. When it’s time to place the beef into the oven there is no need to transfer it to an oven tray just place the lid on the pan and pop it in the oven. Be careful when removing the pan as it will be extremely hot, so always use oven gloves. The stainless steel interior of the pan is a great non-reactive and hygienic surface but oil and beef fat may stick the pan after cooking, however do not fret! Fill the pan with hot soapy water and leave for 15 minutes before cleaning. Also, if you want to restore the shiny exterior of your Copper Tri-ply pan try one of our polishing methods here or enjoy the ever changing shades of the penny brown copper colour.

    Written by Robert

    Image of ProWare's Cote de boeuf mini pan

    Serves: 2

    Prep time: 4 minutes

    Cooking time: 14 minutes


    Ingredients

    • 1 x Hereford Côte de boeuf, approximately 650g
    • Maldon Sea Salt
    • Drizzle of olive oil
    • 25g fresh flat leaf parsley, chopped
    • 1 garlic cloves, finely chopped
    • 80g butter
    • 1 teaspoon Dijon mustard

    Equipment


    Cooking Method

    1. Preheat oven to 220°C/428°F.
    2. Sprinkle salt on both sides of the beef.
    3. Heat Sauté Pan with a drizzle of olive oil until it moves around the pan swiftly and starts separating. This means it’s hot enough for you to add the beef.
    4. Add the beef to the pan and let it sear for 2 minutes. Then flip it and sear for a further 2 minutes on the other side.
    5. Place the lid on the Sauté Pan and put the pan into the oven for 10 minutes for a rare finish or 12 minutes for medium rare flipping the beef half way through the cooking time.
    6. Meanwhile, melt the butter in a Mini Pan and once melted add the finely chopped garlic, then a minute later the chopped parsley and mustard. Stir to combine then cook for 3 minutes further before removing from heat.
    7. Remove the beef from the oven when desired finish is reached.
    8. Slice the Côte de boeuf then enjoy it with a Silver Mini ladle full of garlic butter and with sweet potato or regular chips.
  2. Autumn Venison and Pheasant Stew

    Comments Off on Autumn Venison and Pheasant Stew

    Pheasant has just come into season and when combined with a bit of venison and a splash of red wine it makes for a hearty stew. Recently game has been growing in popularity as an alternative to more everyday meats and can be bought at Marks and Spencers as well as Sainsbury’s. This is likely to be a combination of it’s versatility and nutritional benefits as it tends lower in fat and rich in iron. The butternut squash is added in two stages in order to allow the initial batch to break down and add body to the stew. I used butternut squash as that is what I had to hand, but pumpkin and acorn squash are also in season and would add a sweet richness to the stew as well.

    Written by Robert

     Image of ProWare's autumn venison and pheasant stew

    Serves: 6
    Prep time: 20 minutes
    Cooking time: 2.5 hours


    Ingredients

    • 250g Venison, boned
    • 400g Pheasant, boned
    • 2 tbsp of flour
    • 2 tbsp vegetable oil
    • 3 cloves of garlic
    • 1 butternut squash
    • 1 onion
    • 1 parsnip
    • 2 carrots
    • 300ml red wine
    • 600ml chicken stock
    • 2 bay leaves
    • 1 teaspoon peppercorns
    • Handful chopped rosemary
    • Salt and freshly ground black pepper

    Equipment


    Cooking Method

    1. Preheat the oven to 150°C.
    2. Dice the venison and pheasant and then toss lightly in flour.
    3. Peel and finely slice the garlic. Peel all the vegetables. Dice the butternut squash, quarter the onion and cut the parsnip and carrot into chunky batons.
    4. Heat the oil in the base of the stock pot, add the garlic and fry for 30 seconds. Add the meat and brown over a high heat.
    5. Once the meat is browned reduce the heat and push it to one side of the stock pot. Add the onion and gently sweat them for 3-4 minutes.
    6. Add half of the butternut squash along with the wine, stock, bay leaves and the rosemary.
    7. Season with salt & pepper to taste. Cover and place into the pre-heated oven for an hour and a half.
    8. Remove the pan from the oven, stir the stew and then add the other half of the butternut squash, the parsnip and the carrots.
    9. Cover and then place back in the oven for a further hour.
    10. Remove from the oven, check the seasoning, serve with a sprig of rosemary on top, some sourdough bread and a glass of bold red wine.


  3. Meatloaf

    Comments Off on Meatloaf

    Despite its European origins, meatloaf is eaten all over the world; a few years ago it was voted the 7th favourite dish in the US. Varieties involve using other ground meat rather than beef, not just poultry but seafood too! You could try wrapping it in ham as they do in Austria, or stuffing it with hard boiled eggs which is popular in Cuba, Germany and Greece. For the leftovers (if there is any!) , fry it and serve for breakfast as they would in the Philippines!

    Photo of ProWare's Meatloaf Recipe Prep

    This is a quick and easy recipe, great for if you want a traditional home cooked meal and you don’t want to be stood in the kitchen for ages making it! This meatloaf can be served with vegetables and gravy, however we paired it with a homemade spicy tomato salsa for a bit of a fresh kick.

    Written by Danielle

    Image of Meat Loaf Recipe - ProWare Family Favourites

     Serves: 4-6  

    Prep time: 15 minutes 

    Cooking time: 55 minutes


    Ingredients

    For the meatloaf

    • 2 slices of brown or white bread (or you can use 80 grams breadcrumbs)
    • 1 kg beef mince (we used 5% fat, lean mince)
    • 1 large red onion, chopped
    • 3 tablespoons tomato ketchup
    • 1 egg
    • 2 tablespoons of Worcestershire Sauce (we used Sheffield’s own Henderson’s Relish)
    • 70g Parmesan Cheese, grated
    • 1 tablespoon milk
    • Salt and pepper to season

    For the salsa

    • 300g tomatoes, chopped
    • Half a red onion, chopped
    • 1 chilli, chopped (more if you’re feeling brave!)
    • 2 tablespoons of fresh coriander, chopped
    • Juice of half a lime
    • Salt and pepper to season

    Equipment

    • Large Bowl
    • Knife
    • Chopping board
    • Wooden spoon or similar
    • Food processor
    • 23cm x 13cm loaf tin

    Cooking Method

    1. Preheat the oven to 180°C/350°F/Gas 4.
    2. Place the bread in a food processor and pulse to make breadcrumbs.
    3. Mix all the other meatloaf ingredients together with the breadcrumbs.
    4. Place in an ovenproof dish or loaf tin. Bake in the oven for 50-60 minutes, or until a skewer inserted into the centre comes out clean.
    5. Make the salsa whilst the meatloaf is cooking by mixing all of the ingredients together.


  4. Chorizo Pasta

    Comments Off on Chorizo Pasta

    My 5-year-old must ask for this meal 2-3 times a week. I do try and vary mealtimes a little more than that, but his demands are met at least fortnightly, if not weekly!

    Image of Chorizo Pasta - ProWare's Family Favourites

    The recipe is so quick and easy to make, it is packed with the good stuff and is perfect for making the night before when I know we’re going to be back late from an after school club (usually football in our house!) – 10 minutes heating up while the pasta cooks and voila!

    Written by Rachel

    Kids in the Kitchen

    Chorizo – A challenge for little fingers, get your kids to try and peel the skin off the chorizo. This isn’t necessary though will make the chorizo more tender having removed it but may be fun for them to try and also may keep them entertained for a while.

    Pasta – Get out the scale and measure how much pasta you need. If each person typically eats 100 grams pasta and there are 4 of you altogether, how many grams is that in total! If they are into this you can have a more fun with the scale by weighing 10 or 20 pieces of pasta and work out how many pieces will feed one person and so on.

    Image of ProWare's Chorizo Pasta - Family Favourites

    Serves:  4
    Prep time: 5 minutes
    Cooking time: 20-25 minutes


    Ingredients

    • 1 chorizo ring, sliced
    • 1 white onion, chopped
    • 1 red onion, chopped
    • 1 red pepper, roughly chopped
    • 1 orange pepper, roughly chopped
    • A handful of mushrooms, chopped in quarters
    • 1 small tin sweetcorn, drained
    • 1 large jar passata (approx. 680g)
    • 400g pasta to serve
    • Parmesan to serve, grated

    Equipment


    Cooking Method

    1. Gently fry the sliced chorizo in the sauté pan over a medium heat. There is plenty of oil in the sausage so no need to add any extra.
    2. Whilst this cooks, chop the onions, peppers and mushrooms.
    3. When the chorizo has started to brown (5-10 minutes), drain about half of the oil from the pan and throw in the chopped vegetables. Fry for about 5 minutes.
    4. If you are going to eat immediately turn on the pasta at this point.
    5. Once the vegetables have softened, add in the jar of passata and the drained sweetcorn. Cook for a further 10 minutes to allow the flavours to fuse.
    6. Drain the pasta and serve topped with Chorizo pasta sauce and a dusting of grated Parmesan.
  5. Roast Lamb with Pickled Shallot Mint Sauce

    Comments Off on Roast Lamb with Pickled Shallot Mint Sauce

    The lamb roast – a great show stopping centerpiece for any celebratory meal or even your usual Sunday lunch. You simply can’t beat it, especially with a freshly made mint sauce.

    pickled shallot collage

    This Pickled Shallot Mint Sauce is a twist on your traditional mint sauce inspired by a love of pickled and fermented foods. I can guarantee you’ll enjoy this light and tasty, no fuss sauce alongside your roast lamb. Pickled and fermented foods have been gaining in popularity over the last few years and have become quite ‘trendy’ given the interest in their bold flavours, health benefits and a desire to create hand crafted foods with artisan technique.

    Lamb collage 2

    For the lamb, we’ve cooked it based on a Hugh Fearnley-Whittingstall recipe which uses the typical garlic and rosemary combination with the addition of slivers of anchovies as a means to season the joint. This recipe is a fail safe one we have used on many occasions.

    Written by Corin

    sauce and lamb collage

    Serves:  6
    Prep time: 25 minutes
    Cooking time: 3 hours


    Ingredients

    For the Roast Lamb

    • 1.8-2kg leg of lamb
    • 50g tin of anchovies
    • 4-5 sprigs of rosemary
    • 5 garlic cloves, peeled then sliced lengthwise into 2 or 3
    • 1/2 bottle of dry white wine
    • Freshly ground black pepper

    For the Pickled Onion Mint Sauce

    • 3 banana shallots, sliced into thin circles
    • 2 bunches of mint, leaves finely chopped
    • 140ml white wine vinegar
    • 140ml boiling water
    • 1/2 teaspoon salt
    • 2 tablespoons caster sugar

    Equipment


    Cooking Method – Roast Lamb

    1. Preheat the oven to 220°C.
    2. Use a small knife to make about 12 5cm deep cuts into the flesh side of the joint. Insert a piece of garlic with half an anchovy and a small piece of a sprig of rosemary into each cut.
    3. Drizzle the remaining oil from the anchovies over the leg of lamb. Sprinkle over plenty of black pepper and place lamb in the roasting tray pouring the wine around it.
    4. Put in the oven and let sizzle for 30 minutes then turn down the oven temperature to 180°C and roast the lamb for a further 50 minutes, depending on how rare you would like your meat. These timings will yield a medium-rare roast so for a more well done roast cook slightly longer.
    5. Periodically baste the meat during this time with the wine and juice in the roasting tray. Once done, take the roast out of the oven and remove from tray onto a double layer of aluminium foil and wrap it securely. Leave the roast lamb to rest for 15 minutes with a few tea towels around it as well for insulation.
    6. In the meantime, taste the juices to see if any seasoning is needed and if the juices are too thin, decant into a saucepan and reduce slightly over a medium heat on the hob.

    Cooking Method – Pickled Shallot Mint Sauce

    1. Bring a medium saucepan of water to the boil.
    2. Par-blanch the shallots by placing them in the sieve and putting the sieve in the boiling water for 1 minute, moving the shallots around with a spoon so they are evenly blanched, then remove. You can also hold the sieve over the sink and pour the boiling water over the shallots.
    3. In a bowl place the chopped mint, shallots, white wine vinegar, boiling water, salt and sugar, then mix well.
    4. Let stand for 10 minutes and serve with meat when it is ready. Use the sauce within 5 days of making.
  6. Shin Beef Stew with Dumplings

    Comments Off on Shin Beef Stew with Dumplings

    The clocks have gone back, the leaves on the trees are turning … winter is coming! But it’s OK because that means slow-cook season is back.  

    In my opinion a delicious beef stew will bring warmth and comfort to even the coldest day. Shin of beef is perfect for stewing, it is a reasonably cheap cut of meat with a lovely gelatinous grain running through it. When you cook it slowly in a delicious broth the ingredients transform into a rich, melt-in-the-mouth ‘wonder-dish’. 

    I’ve included a few of Sheffield’s finest ingredients in our recipe. Henderson’s Relish has been made in Sheffield since 1885. It is a secret blend of tamarinds, cayenne peppers, vinegar, garlic and cloves. A splash or two of Hendo’s adds layers of sweetness and spice to the stew. I chose Bradfield Brewery’s Farmers Brown Cow for the ‘ale’ element of the stew. Bradfield is a picturesque village nestled away in the Peak District. The brewery uses natural spring water from a borehole on its own farm, together with the finest malts and traditional hops to brew their award-winning beers.

    You might notice something a bit different about the pan that we’ve used for this recipe. This is the first outing of our premium copper base stockpot. We developed the new range of cookware to complement the existing copper tri-ply. The bodies are made from one thick sheet of 18/8 grade stainless steel, making them lighter than the copper-tri-ply. The base is a combination of stainless steel, aluminium and copper utilising the same energy-efficient and heat-dispersing technology that you find on the professional tri-ply range. The stainless steel doesn’t tarnish in the same way the copper does so it is really easy to keep the pan bodies looking pristine. The pans have deep bodies to ensure that they have serviceable, family-friendly capacities. We also opted for glass lids which means that you can keep an eye on your food bubbling away on the hob-top and we included a soft grip section on the handles for a bit of additional comfort when the pans are being used. We are so excited about the pans making their way to market and we hope that you love them too.

    Written by Faye

    ProWare Copper Base Range Stew

    Serves:  6 as a main dish

    Prep time: 25 minutes

    Cooking time: 3 hours


    Ingredients

    For the Stew

    • 1kg shin of beef, cut into ‘egg-size’ chunks
    • A handful of flour, seasoned with salt and pepper
    • Beef dripping (or another fat such as butter or olive oil)
    • 2 onions
    • 400ml beef stock
    • Bottle of ale (300 – 400ml)
    • 2 bay leaves
    • A few sprigs of thyme
    • 10 – 12 chantenay carrots
    • 1 large parsnip, cut into chunks
    • 4 small turnips, cut into chunks
    • A few splashes of Henderson’s Relish, to season

    For the Dumplings

    • 75g suet
    • 150g plain flour
    • A pinch of mustard powder
    • Salt and pepper for seasoning

    Equipment


    Cooking Method

    1. Toss the chunks of beef in the seasoned flour.
    2. Heat the fat in the stockpot until it is very hot. Fry the meat in batches, ensuring that the meat is evenly brown. Remove the meat with a slotted spoon, leaving some fat behind in the pan.
    3. Fry the sliced onions in the fat left in the pan. Cook the onions gently for 5 minutes until they are a medium brown colour.
    4. Return the fried meat cubes to the pan and combine with the onions. Deglaze the pan by adding a splash of the stock and scraping up the flour and any of the seasoning which might be starting to stick to the pan. 
    5. Add the beef stock, the beer and the bay leaves. Cover and bring to the boil. Reduce the heat and simmer for 2 to 2 and a half hours.
    6. Prepare the dumplings by mixing the suet, flour and mustard powder together in a bowl. Add a few tablespoons of water, just a little bit at a time to ensure that the dumplings don’t become too sticky. Don’t overwork the mixture, the dumplings should be just about moist enough to ensure that the ingredients hold together when rolled into balls. Separate out into 8 balls, cover & refrigerate.
    7. After about one hour on the hob top add the thyme and the vegetables.
    8. 20 – 25 minutes before you are ready to serve sit the dumplings on the top of the stew and cover with the lid. The dumplings will increase in size so remember to leave plenty of space between them.
    9. Once the dumplings are cooked through serve the stew in pre-heated bowls. Season with Henderson’s relish to taste and enjoy!


  7. Texas Inspired Hog Roast

    Comments Off on Texas Inspired Hog Roast

    If you’ve ever had good BBQ or smoked meat, you know there is nothing else like it. In 2012 my husband and I along with some of our friends travelled to Texas for our close friend’s wedding and the people, the heat and most of all the food did not disappoint. When in Texas, one must eat as a Texan and that is what we did. Our host and hostess planned many ‘Americazing’ food venues for us to visit including one BBQ restaurant, The Salt Lick, which featured in the TV show Man V Food. Here we tasted scrumptious brisket, succulent sausages and finger lickin’ ribs which has seemed to fuel our obsession with smoked food since returning to the UK.

    ProWare's Hog Roast - photos from Texas

    We have done brisket (our favourite) many times now, pork chops and salmon, but my husband being ever keen for something bigger and better decided he wanted to slow roast half a pig. We’ve done it twice now, once in April and then again in August for a large family reunion, both of which were roaring successes. We also referred to Project Pig in Manchester for guidance & instruction which proved very helpful.  The next plan of action is to attempt spit roasting a lamb.

    Written by Corin

    Serves: 40+

    Prep time: 2 hours

    Cooking time: 14-17 hours

    Building the Pit

    We used breeze blocks to construct the pit and made a wooden frame which we later wrapped in aluminium foil and used wire to attached various oven shelves to. The frame fit in the pit so we could rest the pig on this while cooking and also remove it more easily when it had finished cooking. Another option is to get wire racking to cook the pig on, however it’s important to make sure this wire is food safe and okay to cook with.

    Scoring the Skin

    We used a Stanley knife to score the skin side of the pig as you would for a typical pork roast, in intervals of 2cm, being careful not to penetrate the fat through to the meat layer.

    Salt

    After scoring the skin we massaged salt into the exterior of the pig on both sides starting with the rib side first using Maldon Sea Salt. The smoked Maldon Sea Salt is preferable; however we just used what we had. Be very generous with the salt (we must have gone through over a box of the sea salt) and then leave the salt to sit for a half an hour. This will dry out the moisture in the skin and hopefully lead to yummy crackling.

    Olive Oil

    After letting the salt sit for half an hour brush it off and cover the whole pig in a generous amount of olive oil.

    Dry Rub

    Then massage in the dry rub. Any homemade or store bought spice/herb mix will do. Ours had cayenne pepper, garlic powder, onion powder, paprika, black pepper and tarragon.

    Meat Injections

    We injected the meat with a mixture of apple, white grape, and lots of sugar and salt.  Quantities wise, we used approximately 2 cups of apple juice, 2 cups of white grape juice and 3 heaping dessert spoons of sugar and salt. Using a meat injector, we used something similar to this, to inject the meat with juice in various different places.

    Aluminium Foil

    Next was to wrap the pig in aluminium foil and transfer it (requiring at least 2 people) to the pit. Make sure the pig is wrapped securely. The juice injected in the pig will enable the meat to slowly steam and become very, very tender.

    pig prep

    Timings and Temperatures

    We roasted the pig for a total of 16 hours(Starting at around 9pm and finishing the following day around 1pm) It’s helpful to use a meat thermometer to check the internal temperature, which should reach at least 66°C and no more than 69°C. About 3 hours before serving we unwrapped the foil from the pig and flipped it so it was skin side down on the grates. Then 1 hour before eating we flipped it back over to heat the other side and raked the coals under the pig to lower the heat. We then removed the pig from the roasting pit and wrapped it loosely with the aluminum foil and let it rest for 30 minutes before eating.

    Fire

    We used store-bought hardwood charcoal (it’s even better if you can make your own!) mixed with wood to get it going.  We used a small fire pit to one side of the large roasting pit to prepare the charcoal. The fire should be fuelled about every hour to hour and a half. Throughout the night we took it in shifts to get up, build a new fire and wait for the charcoals to become red.  Once we unwrapped the pig we added a few hickory wood lumps/briquettes (not charcoal) when refueling the fire which adds a smokey flavour. These are easily available online.

    Hog roast during

     Apple Sauce and BBQ Sauce

    We made a simple Bramley apple sauce and BBQ sauce for people to add to their meat. There are lots of different recipes online so you can choose one to your liking. Check out the BBQ sauce here and applesauce here.

    party time


  8. Pot Roast Chicken

    Comments Off on Pot Roast Chicken

    This is a great one-pot option for your Sunday Roast. A large stockpot with a tight fitting lid is essential when pot roasting.

    ProWare's Pot Roast Chicken

    The lid ensures the moisture is kept in, creating a steamy environment keeps the meat nice and tender. As with all meats you are likely to get tastier results if you buy outdoor reared produce from a reputable local supplier. You probably won’t use all the gravy but don’t discard it as it will make an excellent base for soup.

    ProWare's Pot Roast Chicken on a blue plate

    Serves: 4

    Prep time: 10 minutes

    Cooking time: 1 hour 20 minutes


    Ingredients

    • 1 whole Chicken (around 1.5-2kg)
    • 60g unsalted butter
    • Sea salt flakes (to taste)
    • Freshly ground black pepper (to taste)
    • Drizzle of olive oil
    • ½ Lemon
    • 1 whole garlic bulb (this may seem like a lot of garlic but it will add depth to the flavour of the sauce and will not be overpowering once cooked)
    • 100ml dry white wine
    • 4 shallots peeled and cut in half
    • 2 large carrots, peeled and chopped into chunky pieces
    • 4 potatoes, peeled and cut into pieces about the size of a walnut (cutting the potatoes any smaller runs the risk of them ‘dissolving’ into the sauce)
    • 2 sprigs (leaves only) of an aromatic herb such as sage, rosemary, or thyme
    • Freshly boiled water
    • 5g unsalted butter
    • 1 dessert spoon of plain flour

    Equipment

    • Copper Tri-ply 24cm Stockpot
    • Knife
    • Chopping board
    • Large plate
    • Oven gloves for handling the pan in and out of the oven and on the hob top. The handles of the stockpot will get very hot whilst in the oven and will retain heat for a long time, so be when careful when handling! Oven gloves are essential.

    Cooking Method

    1. Preheat the oven to 220°C.
    2. Mix the salt and black pepper into the 60g of butter and rub it all over the chicken.
    3. Place the half lemon inside the body cavity of the chicken. Chop the garlic bulb in half horizontally and place it into the stockpot along with the chicken.
    4. Drizzle the cut garlic with a bit of olive oil then place the stockpot in the oven (without the lid) and allow the skin to crisp for 20 minutes.
    5. Once the chicken has browned use the oven gloves to bring the stockpot onto the hob, transfer the chicken to a warm plate and add the wine to the stockpot to deglaze it, over a medium heat, getting any caramelised bits off the base of the pot. These will add flavour to the finished dish.
    6. Put the chicken back into the stockpot and add the vegetables, herbs and just enough of the freshly boiled water to half cover the chicken. Place the lid on the stockpot and return to the oven using your oven gloves. Reduce the temperature to 190°C and cook for a further 50 minutes.
    7. Once the chicken is fully cooked remove from the pot and cut into sections. Serve alongside the vegetables.
    8. Thicken the sauce by mixing a dessert spoon of plain flour into a paste with the remaining butter and then whisk the paste into the sauce in the pan. The sauce must be boiled gently for a minute or so in order to cook the flour.
    9. Serve the chicken pieces with the vegetables, potatoes and a splash of the gravy. We added a handful of watercress to the plate for a fresh summery taste.
  9. Green Peppercorn Sauce for Steak by Leiths

    Comments Off on Green Peppercorn Sauce for Steak by Leiths

    Impress guests with this classic sauce made from green peppercorns. It’s a perfect accompaniment to steak and couldn’t be quicker to make.

     steak3

    Thank you to Leiths School of Food and Wine for sharing it with us.

    leithssteak2

    Serves: 1

    Prep time: 1 minute

    Cooking time: 10-15 minutes


    Ingredients

    • 2 teaspoons canned or frozen green peppercorns
    • Oil
    • 2 tablespoons brandy per steak
    • 2 tablespoons double cream per steak
    • Salt

    Equipment


    Cooking Method

    1. Rinse the peppercorns if they are canned.
    2. Pour a little oil into a frying pan. Heat until hot. Fry a steak of your choice fast on both sides, until done to your liking.
    3. Remove steak onto warmed serving dish and carefully remove fat from the pan.
    4. Deglaze the pan with 2 tbsp water and pour deglaze into heat proof dish and reserve for later.
    5. Take care when adding the brandy as it may produce flames. Pour in the brandy for one steak, flambé then add the reserved deglaze.
    6. Add the peppercorns, cream and a pinch or two of salt to the pan. Mix well, scraping up any juices stuck to the bottom of the pan. Boil and pour over the steak.
  10. Swedish Meatballs

    Comments Off on Swedish Meatballs

    Made with a mix of pork and beef as well as warming spices these Swedish Meatballs are sure to delight.

    meatball3

    Makes: 40-50 Meatballs

    Prep time: 1.5 hours

    Cooking time: 40 minutes


    Ingredients

    Meatballs

    • 1 large onion, finely diced (the smaller the better!)
    • 2 tablespoons unsalted butter
    • 70 grams breadcrumbs
    • 220ml whole milk
    • 2 medium sized eggs
    • 500g minced pork
    • 500g minced beef
    • 2 teaspoons salt
    • 1 teaspoon ground nutmeg
    • ½ teaspoon ground green cardamom seeds
    • 1 teaspoon all spice
    • 2 teaspoons crushed fresh black pepper

    Saucemeatball2

    • 6-10 tablespoons unsalted butter
    • 420g plain flour
    • 800ml beef stock
    • 50-100ml double cream
    • 2 to 4 tablespoons of lingonberry jam (if not available raspberry or cranberry jam can be substituted)
    • Salt and pepper to taste

    Equipment


    Cooking Method

    For the Meatballs

    1. In the bowl of an electric mixer or in a large bowl mix the breadcrumbs and milk. Leave for 5 minutes for the breadcrumbs to soak up the milk.
    2. Meanwhile, sauté the onion in the frying pan with the butter over a medium heat until the onions start to break down and are soft and translucent. This should take about 3-5 minutes.
    3. Remove from heat and let cool.
    4. Add the remaining meatball ingredients to the bowl of milk and bread, and then add cooled onions. If you have an electric mixer, use this to beat all ingredients on low until smooth, then turn on high and leave for around ten minutes or until the mixture becomes light and fluffy.
    5. If you don’t have an electric mixer, use your hands and mix well until all ingredients are combined.
    6. Measure about a tablespoon of the mixture and use wet hands to roll into a ball shape until all the mixture is used, putting them on a large oiled tray as you go. Cover the tray with clingfilm and put them in the fridge for 1 hour. The mixture should make around 40-50 meatballs.
    7. Heat 3 tablespoons of the butter reserved for the sauce over medium heat in a large non-stick frying pan being careful not to burn the butter. When the butter has melted, add some of the meatballs, however do not put too many meatballs in the pan at one time so allowing them space to brown. The meatballs are only browned at this stage as they will be cooked all the way through at a later stage.
    8. Gently turn the meatballs being careful so that they don’t fall apart. Once they have been slowly browned all over, use a slotted spoon to move them onto a plate and repeat with second batch, adding remaining butter to the pan. Continue with this stage until all meatballs are browned keeping the butter left in the pan for the sauce.

    For the Sauce

    1. Slowly mix in the flour to the remaining butter mixture the meatballs were cooked in. Cook for 1 minute until it darkens slightly and then gradually add the warmed beef stock little by little, mixing constantly. Once all beef stock has been added, return the meatballs to the fry pan and allow to simmer on low for 10 minutes.
    2. Remove meatballs from sauce and arrange them on a serving plate. Then add double cream and the lingonberry jam (or substitute) to the sauce and mix well. Either drizzle the sauce on top of the meatballs if serving as a main meal or put the sauce in a bowl to be served beside the meatballs in the case of a Smorgasbord or Swedish buffet.