Tag Archive: cookware

  1. Sumac Baked Feta with Crispy Chickpeas and Harissa Yoghurt from Eat with Beder

    Comments Off on Sumac Baked Feta with Crispy Chickpeas and Harissa Yoghurt from Eat with Beder

    We have recently teamed up with the amazing charity Beder to raise more awareness around mental health and the benefits home cooking can have on it. This recipe is from Eat with Beder and is by Julie Bentley. You can find out more on their website here.

    Beder was created in memory of Beder Mirjan who sadly took his own life aged 18 on 7th April 2017. The charity continues to do amazing work raising awareness about the importance of mental health and suicide prevention.

    Eat with Beder is perfect for any home cook because it is filled with a diverse range of easy-to-follow recipes covering all occasions. Through quotes with its collaborators, it raises awareness about mental health and suicide prevention through the power of food.

    We recently launched two Beder Bundles so you can now purchase either Eat with Beder and your choice of ProWare Sauté Pan here, or From Beder’s Kitchen and your choice of ProWare Sauté Pan here.

    Find out which one of our ranges might suit you best, by checking out what we love about each of them here.

    Serves: 2-4
    Prep time: 10-25 minutes
    Cooking time: 35 minutes


    Ingredients

    • 1 large onion, peeled and thinly sliced
    • 2 cloves of garlic, peeled and diced
    • 250g cherry tomatoes, halved
    • 1 x 400g tin of chickpeas, drained
    • 100g pine nuts
    • 2 tsp paprika
    • 1 tsp dried oregano
    • 1 tsp dried rosemary
    • 2 tsp sumac
    • Sea salt
    • Olive oil
    • 1 block of feta (about 200g)

    For the Harissa Yoghurt

    • 200g Greek-style yoghurt
    • 2 tbsp rose harissa
    • 1 lemon, juiced

    To Serve

    • Handful of chopped parsley
    • Small handful of pine nuts

    Equipment


    Cooking Method

    1. Preheat the oven to 220c/200c fan/Gas Mark 7.
    2. Place the onion, garlic, cherry tomatoes, chickpeas and pine nuts into a large ovenproof baking dish (we used our ProWare Stainless Steel Tri-Ply Sauté Pan).
    3. Add the paprika, oregano, rosemary, 1 teaspoon of sumac and a pinch of salt.
    4. Mix well until everything is coated in the spices before drizzling in olive oil, then mix again until it’s all coated in the oil.
    5. Place the feta on top of the vegetables in the dish. Drizzle it with olive oil and season with the remaining sumac and a pinch of salt.
    6. Cook the whole dish in the preheated oven for 25-30 minutes until the vegetables are cooked through and crispy on the outside.

    For the Harissa Yoghurt

    Mix the yoghurt with the harissa, lemon juice and a pinch of salt in a small bowl.

    To serve

    Once the feta and chickpea mixture has finished baking, transfer the dish from the oven to the table and serve up with some extra parsley and pine nuts sprinkled on top, and the harissa yoghurt on the side.
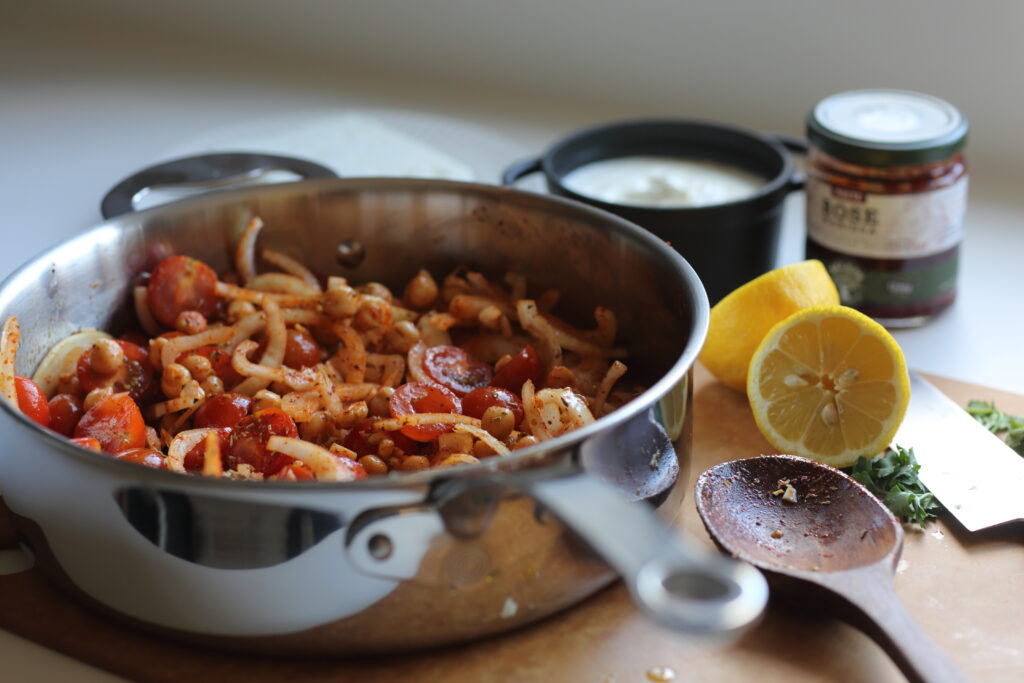
    Sumac Baked Feta with Crispy Chickpeas and Harissa Yoghurt
    Our Stainless Steel Tri-Ply Sauté was perfect for this dish!
  2. Crispy Chicken and Coconut Noodles from Eat with Beder

    Comments Off on Crispy Chicken and Coconut Noodles from Eat with Beder

    We have recently teamed up with the amazing charity Beder to raise more awareness around mental health and the benefits home cooking can have on it. This recipe for Crispy Chicken and Coconut Noodles from Eat with Beder is from Eat with Beder and is by television personality, Denise Welch.

    Beder was created in memory of Beder Mirjan who sadly took his own life aged 18 on 7th April 2017. The charity continues to do amazing work raising awareness about the importance of mental health and suicide prevention. You can find out more on their website here.

    Eat with Beder is perfect for any home cook because it is filled with a diverse range of easy-to-follow recipes covering all occasions. Through quotes with its collaborators, it raises awareness about mental health and suicide prevention through the power of food.

    We recently launched two Beder Bundles so you can now purchase either Eat with Beder and your choice of ProWare Sauté Pan here, or From Beder’s Kitchen and your choice of ProWare Sauté Pan here.

    Find out which one of our ranges might suit you best, by checking out what we love about each of them here.

    Serves: 2
    Prep time: 15-30 minutes
    Cooking time: 25 minutes


    Ingredients

    For the noodles

    • 1 tbsp vegetable oil
    • 3 cloves of garlic, minced
    • 4 spring onions, finely sliced
    • 5cm fresh ginger, grated
    • 1 tbsp tomato paste
    • 1/2 tsp gochugaru or chilli flakes
    • 400ml tinned coconut milk
    • 1 tbsp soy sauce
    • 2 pak choi, halved lengthways
    • 2 packets dried ramen (180g)

    For the crispy chicken

    • 2 chicken breasts
    • 40g plain flour
    • 1 egg, beaten
    • 50g panko breadcrumbs
    • 2 tbsp vegetable oil

    To Serve

    • Jammy soft-boiled eggs, halved
    • Spring onions, finely chopped
    • Sesame seeds
    • Chilli flakes
    • Chilli oil

    Equipment


    Cooking Method

    For the noodles

    1. Put the oil into a Copper Tri-Ply 20cm Saucepan over a medium heat and add the garlic, spring onions and ginger. Fry for 1-2 minutes until fragrant and starting to soften.
    2. Add in the tomato paste and gochugaru or chilli flakes and cook for 30 seconds.
    3. Pour in the coconut milk, soy sauce and 250ml of boiling water and stir to combine, then take off the heat and set aside until needed.

    For the crispy chicken

    1. Put the chicken breasts between two sheets of parchment and bash with a rolling pin to flatten until they are an even 1-2cm thickness.
    2. Put the flour, egg and breadcrumbs into 3 seperate bowls.
    3. Season the chicken breasts with salt and then dip them into the flour, then the beaten egg and finally the breadcrumbs until fully coated.
    4. Heat the oil in a Copper Tri-Ply 24cm Sauté Pan and fry the breadcrumbed chicken for 5-6 minutes on either side until golden brown and cooked through.

    For the noodles

    1. Once the chicken is almost cooked, bring the coconut milk broth you made earlier to the boil and then turn the heat down to a simmer.
    2. Add the pak choi and ramen, then cover and simmer for 3-4 minutes, stirring occasionally until the pak choi is soft but still has a bite and the ramen is cooked.

    To serve

    1. Slice the crispy chicken diagonally into strips.
    2. Ladle the ramen noodles, pak choi and broth into bowls, place the chicken on top and finish with your desired toppings such as soft-boiled eggs and spring onions.
    3. Sprinkle over some sesame seeds and chilli flakes, then drizzle with chilli oil if you like.
    Crispy Chicken Noodles from Eat with Beder
  3. Murgh Makhani (Butter Chicken Curry)

    Comments Off on Murgh Makhani (Butter Chicken Curry)

    Originating from New Delhi, Murgh Makhani translates as Buttery Chicken and is a world-renowned and loved Indian curry. Because of its mild and sweet flavour, it goes perfectly with our Coriander Rice (see the recipe below) but if you’re not a coriander fan then basmati rice works just as well!

    This Murgh Makhani (Butter Chicken Curry) is perfect for a Friday Night Fakeaway, weekend meal for the family, or can be meal prepped and frozen for later. If you have the time then you should definitely consider marinating the chicken overnight for an extra punch of flavour and aroma.

    Our Copper Base Sauté Pan is the star of the show in this recipe so find out what we love most about this range here.

    Muyrgh Makhani Butter Chicken

    Curry

    Serves: 4
    Cooking time: 35 minutes

    Coriander Rice

    Serves 4

    Cooking time: 20 minutes


    For the Marinade

    • 600g boneless chicken thigh/breasts
    • 100ml plain yoghurt
    • 1 tbsp minced garlic
    • 1 tbsp minced ginger
    • 2 tsp garam masala
    • 1 tsp turmeric
    • 1 tsp cumin
    • 1 tsp chilli powder
    • 1 tsp salt

    For the curry

    • 2 tbsp oil
    • 20g butter
    • 1 onion chopped
    • 1 tbsp minced garlic
    • 1 tsp minced ginger
    • 1 tsp cumin
    • 1 tsp garam masala
    • 1 tsp ground coriander
    • 1 tin 400g crushed tomatoes
    • ½ tsp chilli powder
    • 100ml double cream
    • ¼  tsp sugar
    • 1 tsp fenugreek leaves
    • 1 tbsp coriander, finely chopped

    For the Coriander Rice

    • 300g basmati rice
    • 500ml water
    • ¼ tsp salt
    • 60g butter
    • 1 small bunch of coriander, finely chopped

    Equipment


    Cooking Method (Curry)

    1.  Marinate the chicken with all the marinade ingredients for at least 30 minutes, or overnight if you have the time.
    2. Heat 2 tbsp oil in the pan, brown the chicken for 5 mins turning once halfway through, and then set it aside.
    3. In the same pan, swirl in the butter and the onions, scraping the bottom bits of the pan. Fry for 5-8 minutes until the onions soften, stirring regularly.
    4. Stir in the garlic and ginger and fry for 1 minute until fragrant, then add the ground coriander, cumin, chilli powder and garam masala for a further minute to cook out the spices.
    5. Pour in the crushed tomatoes and then simmer for 10 minutes until the sauce thickens and turns a deep red brown. Blend the sauce.
    6. Stir through the cream, sugar and methi leaves. Add the chicken with its juices back into the pan and cook for a further 8 minutes. Stir through and garnish with the chopped coriander.

    Cooking Method (Coriander Rice)

    1. Melt the butter in the saucepan and fry the coriander until it wilts, then set aside in a dish.
    2. Rinse the rice and add to the saucepan along with the water and the salt.
    3. Bring the rice up to boiling point, then lower to a gentle simmer with a lid on until all the water is absorbed.
    4. Stir through the melted coriander butter into the rice.

  4. Authentic Thai Jungle Curry with Sea Bass by Marni Xuto

    Leave a Comment
    Chef and content creator Marni Xuto with a recipe at the Great British Food Festival

    Marni Xuto grew up in the heart of Bangkok and her recipes are like love letters to Thai cuisine. She is a content creator and recipe developer, often found giving cooking demonstrations at top food festivals, or cooking classes at School of Wok. We are thrilled to be sharing this Jungle Curry with Sea Bass from Marni and hope you love it as much as we do!

    Head to Marni’s website for more information here and follow her on social media for delicious recipes and top tips for cooking Thai food.

    This recipe is inspired by Songkran or เทศกาลสงกราน (Thai New Year) which is celebrated on 13th April each year. It is also known as the Water Splashing Festival and marks the beginning of the Buddhist New Year.

    Marni’s Authentic Thai Jungle Curry recipe is bursting with flavour. In fact, Jungle Curry is said to take its name from having so many vegetables and plant-based ingredients packed in that it’s like having a dish with an entire jungle in it! Originating from the Northern, forested areas of Thailand, this curry usually omits coconut milk because coconuts aren’t normally found in the rainforests.

    Did you know: Jungle Curry was originally cooked mostly with wild boar! Nowadays it’s most commonly made with chicken or pork but Marni’s version is made with sea bass which is a great pescatarian alternative!


    Serve : 2-3

    Prep time: 10 minutes 

    Cooking times : 10-25 minutes 


    Ingredients for the Jungle Curry paste

    • 50g of shallot, sliced
    • 20g of finger roots, trimmed and chunkily cut*
    • 10g of green British chilli, chunkily cut
    • 10g of Galangal, chunkily cut
    • 10g of coriander stalks
    • 4g of dried medium-heat red chilli
    • 3g of lime zest
    • 1g of red bird’s eye chilli, chunkily cut (optional)
    • 1 stalk of lemon grass, trimmed and chunkily cut
    • 4 cloves of garlic, peeled
    • 2 tbsp of vegetable oil
    • 1-2 tbsp of water
    • 1 tsp of shrimp paste
    • 2/3 tsp of sea salt

    *Fun fact about Finger Roots: Marni says “Finger roots is an essential ingredients for a Jungle Curry because it helps eliminate the strong seafood smell. It is also packed full of remedial properties and some have said it is a Ginseng of Thailand. It helps to ease indigestion, as the original jungle curry is rather spicy which could cause dyspepsia.”  

    Are you struggling to source finger roots? Don’t worry because you can use a small amount of young ginger (7g) and then amend the galangal to 15g as a replacement.

    Ingredients for the Jungle Curry

    • 180g of sea bass fillet, pat dried
    • 100g of bamboo shoots, sliced
    • 80g of red pepper, chunkily cut
    • 80g of green beans, trimmed and cut
    • 80g of Thai eggplant, trimmed and quartered (can be substituted for aubergine)
    • 60g of baby corn, sliced
    • 60g of brocolli, trimmed and cut
    • 15g of holy basil leaves
    • 10g of fresh, young green peppercorn
    • 10g of butter
    • 4 tbsp of vegetable oil
    • 1 tbsp of fish sauce
    • 1 tbsp of oyster sauce
    • 2 tsp of sugar
    • 450ml of water
    • 1 pinch each of salt and ground black pepper

    Equipment

    Marni uses our Copper Base Range in this recipe. Check out 7 things we love about our Copper Base Range!


    Cooking Method

    1. Blend the curry paste ingredients in an electric blender or pound them in a pestle and mortar until smooth. 
    2. Next, gently fry the paste with two tablespoons of the vegetable oil in Copper Base 26cm Sauté Pan over a medium heat until infused and stir it regularly. 
    3. Onto the vegetables! Add the bamboo shoots, red pepper, green beans, broccoli, baby corn and then gently stir them in for approximately 1 minute. 
    4. Pour in the water and then bring it to a boil.
    5. Add Thai eggplant and fresh peppercorn and then simmer it for approximately 20 minutes. 
    6. In the meantime, gently fry the sea bass fillets (with the skin side down first) with the rest of the oil in a Copper Base 24cm Non-Stick Frying Pan over a medium to high heat.
    7. Season the fish with salt and pepper and then add the butter. Once it has stopped spitting, you can then baste the fish as it fries.
    8. After the skin has turned golden and crispy, carefully flip the sea bass and then cook it for approximately 30 seconds to 1 minute.
    9. Continue to baste for a better colour on the skin (if required).
    10. Next, remove the sea bass and then rest it on kitchen paper. 
    11. Scatter holy basil on top of the curry and fold it into the mixture.
    12. Transfer the curry into a serving bowl and then place the fish fillet on the top.
    13. Enjoy and let us know what you think!
    Seabass Jungle Curry served in a ProWare 26cm saute pan
    Serve up and enjoy!

    Marni says: “For me… I just place the fish fillets on top of the curry in the sauté pan and serve. Enjoy this aromatic Thai Curry with Thai Jasmine Rice.


  5. Authentic Thai Nam-Prik-Ong with Spring Vegetables by Marni Xuto

    Leave a Comment
    Chef and content creator Marni Xuto with a recipe at the Great British Food Festival

    Here is another fab recipe from Marni Xuto: Nam-Prik-Ong with Spring Vegetables.

    Marni Xuto grew up in the heart of Bangkok and her recipes are like love letters to Thai cuisine. She is a content creator and recipe developer and can often be found giving cooking demonstrations at top food festivals, or cooking classes at School of Wok.

    Check out Marni’s website for more information here and make sure to follow her on social media for delicious recipes and top tips for cooking Thai food.

    This recipe is inspired by Songkran or เทศกาลสงกราน (Thai New Year) which is celebrated on 13th April each year. It is also known as the Water Splashing Festival and marks the beginning of the Buddhist New Year.

    Originating from Northern Thailand, this dish can be eaten by hand, is easy to make, and is a great dish to share as a dipping sauce in particular. Although it isn’t widely known outside Thailand, it is a true Thai favourite.

    Marni’s Nam-Prik-Ong is served in our Stainless Steel Tri-Ply 9cm Mini Pan. These brilliant little pans are perfect for serving individual portions, side dishes, jus, gravies, you name it. They also come in Copper Tri-Ply!

    Did you know: Nam-Prik means “hot sauce” from nam meaning water and prik meaning chillies!


    Serve: 1-2

    Prep time: 15 minutes

    Cooking time: 45 minutes


    Ingredients for the chilli paste

    • 100g of shallots, chunkily chopped
    • 4g of mild dried chilli, soaked in water
    • 2g os kaffir lime leaves with the stalks removed
    • 1 stalk of lemon grass, chunkily cut
    • 1 bulb of garlic, peeled
    • 2 tbsp of water
    • 1 tbsp of oil
    • 1 tsp of shrimp paste
    • 2/3 tsp of salt

    Ingredients for the dip element

    • 400g of tomatoes, chopped
    • 250g of lean pork mince
    • 150ml of water
    • 90 ml of vegetable oil
    • 1.5 tsp of sugar
    • 1 tsp of fish sauce
    • 1 tsp of tomato puree

    Serve with your choice of spring vegetables

    • 1 artichoke
    • 1 handful of asparagus
    • 1 handful of carrots
    • 1 handful of cabbage
    • 1-2 aubergines

    Equipment

    Marni uses pans from across our ranges in this recipe. Check out what we love about each of them here!


    Cooking Method for the Nam-Prik-Ong

    Authentic Thai Nam-Prik-Ong with Spring Vegetables by Marni Xuto
    You can tell this dish is packed with punchy flavours!
    1. Blend the chilli paste ingredients in an electric blender or pound them in a pestle and mortar. 
    2. Gently fry the paste with the vegetable oil in a Copper Tri-Ply 24cm Non Stick Frying Pan, over medium heat until it has infused. 
    3. Add in the mince and fry it over a medium heat, stirring it until the mince is cooked.
    4. Next to add are the tomatoes. Stir them until the tomato peel comes away from the flesh. 
    5. Pour in the water and bring it to the boil for approximately 5 minutes. Simmer it until the liquid reduces (approximately 25 – 30 minutes), making sure you stir it regularly. 
    6. Meanwhile, prepare the Copper Base 20cm Saucepan and Stainless Steel Steamer. The time you steam the vegetables for will depend on your preference.  
    7. Turn your attention to the Nam-Prik-Ong mixture. Season with the sugar, fish sauce, and tomato puree. Turn the heat up and cook for another 3 minutes. 
    8. Finally, transfer the Nam-Prik-Ong into a Stainless Steel Tri-Ply 9cm Mini Pan. Arrange the steamed and fresh vegetables around the paste, serve with Thai sticky rice, and enjoy!

  6. 7 things we love about our Stainless Steel Base Range

    Leave a Comment

    We have launched a brand new range! If you love the look of our Copper Base range but are cooking on induction then we have a treat for you!

    Our Stainless Steel base range combines all the things we love about our Stainless Steel Tri-Ply and Copper Base range. Read on to find out just how wonderful it is…

    1. Induction (and all hob tops) friendly!

    The Stainless Steel Base Range has triple layer construction in the base only, creating an even heat distribution. Being made from stainless steel, it is also induction friendly!

    The pans use less material around the sides than their triple layer counterparts and so they cost (and weigh) less but, just as with the other ranges, the pans have been carefully specified and engineered and they have been put through their paces in the test-labs and kitchens. As such we are proud to offer a lifetime guarantee on everything except the non-stick milkpan and frying pan (which carries a guarantee against manufacturing fault but unfortunately not on the non-stick coating).

    2. Seeing is believing

    There are so many reasons to use a lid. The heat efficiency achieves a quicker boil and saves energy whilst the lack of splash keeps the walls and hob top clean! The vented, glass lids are a firm favourite feature of our Copper Base range so we’re thrilled to launch it as part of our Stainless Steel range too. If you love keeping an eye on your cooking, be it a sauce, rice, or curry, then this range might be perfect for you!

    3. Great capacity, and light!

    Unlike competitor items our pans are nice and deep so you really can cook for a crowd (or just a hungry family!). Even with their fantastic capacities, they don’t weight too much either. The milkpan holds 1.25 litres and weighs just 670g, while the 16cm saucepan holds just shy of 2 litres and weighs just over 1kg, and the stockpot holds just shy of 6 litres! That’s perfect for a casserole or stew to feed the whole family!

    4. Endurance and comfort

    The comfortable soft grip handles are extremely practical and easy to handle. The silicone wrap means that they will withstand exposure to high temperatures and are oven safe up to 200 degrees celsius.  A steep arch in the handle keeps it away from the heat source, and allows the pans to nest efficiently in cupboards or drawers. An eyelet where the handle meets the pan body disperses heat to ensure handles don’t get too hot and there’s a hanging loop if you want to make them the star feature of your kitchen.

    Larger pans can be heavy when they’re full so we’ve added helper handles to the 18cm and 20cm saucepans. Heavy duty stainless steel rivets provide lifelong durability too so you, and your pans are truly set up for success!

    5. All-Rounder

    These pans work on every hob type; they can go in the oven up to 200ºC; and they’re dishwasher safe! If you prefer to hand wash your cookware, then Bar Keeper’s Friend is your best friend! We have some great top tips on keeping Stainless Steel cookware sparkling clean here.

    6. Eye-Catching Design

    As well as being practical, our Stainless Steel Base range looks great on the outside too! With hooks for hanging, they look great on show in any kitchen.

    7. 5 Star Reviews

    We sell through our own website and Amazon Prime. Our trust pilot rating is 4.9 out of 5 so don’t just take our word for it, check out the numerous customer reviews here. Don’t forget that we also have Copper Tri-Ply, Copper Base, and Stainless Steel Tri-Ply ranges.

    Want to know anything else about our Stainless Steel Base range? Just get in touch and we’d be happy to assist.

  7. Energy Saving Tips for the Kitchen

    Leave a Comment

    How much time do you spend cooking per week? Per year? Well, according to Ideal Home, cooking is the most time-consuming chore in our lives, taking up a whopping 253 minutes per week or 439 days in a lifetime! That might sound like heaven to chefs and foodies but that’s also a lot of energy being used in the kitchen!

    Simple actions like heating up last night’s leftovers or making a quick cup of tea in the advert break can use up a lot more energy than you think. We’ve got some top tips for saving energy in the kitchen:


    1. Make sure the pan covers the entirety of the hob. Any space outside the edge of the pan is where wasted energy will escape.
      Copper Base Milkpan
    2. Make sure you pick the right size pan for the job. A bigger pan takes longer to heat up and you will need more water to fill it. It takes more energy to heat a larger pan with only one fifth full with water in it than it does to heat a smaller pan that is full of water.
    3. Try turning off the heat a couple of minutes before your food is fully cooked. This works particularly well with electric hobs as they can take a while to cool and will continue to cook the food.Energy Saving TIps for the Kitchen
    4. Don’t use more water than you need. Boiling extra water takes more energy and time.
    5. Use a kettle. It is better to heat water in a kettle, rather than on the stove then transfer it into a pan once boiled.
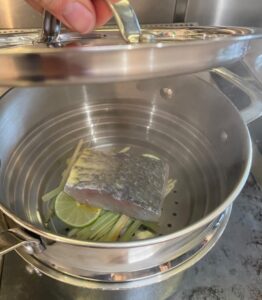
    6. Reduce the number of pans you cook with. This will in turn lead to less washing up, saving water, cleaning products and time.Stainless Steel Tri-Ply Steamer with a piece of fish and lemongrass inside and the lid being lifted off
    7. Try a steamer – it’s not only the best way to cook your vegetables because of the way it retains the nutrients in them but you can also cook several things are once on one heat source. ie boil your pasta in the pot and steam your vegetables in the steamer on top. Check out our Stainless Steel Multi Steamer here. Michelin-starred chef Paul Welburn loves using our Stainless Steel Tri-Ply Steamer to cook fish. Steamers are incredibly energy efficient, using the heat from boiling water below (which you can also use to cook pasta, vegetables, and much more at the same time!). It fits perfectly snugly on top of our saucepans which is great for cooking and storage.
    8. Choose energy efficient products – our stainless steel tri-ply pans are made for induction not only very effective at heating up but the interior metal aluminium acts like a hot water bottle and keeps the pan hot and also helps product an even heat distribution. Also not all induction pans are made the same. We have tested lots of different pans on the market today and some of them even though they are induction compatible still take ages to heat up. We know our Stainless Steel Tri-ply pans are perfect for the job and heat up very quickly.Energy Saving Tips for the kitchen
    9. Try to avoid opening the oven too often. This lets out the hot air and wastes energy when the oven has to work it’s way back up to the set temperature wasting energy.
    10. Have a lid? Use it! Water will boil faster and food will heat quicker when using a lid.


    For more info, the Energy Saving Trust has great ideas here too.

  8. An Evening at Jude Kereama’s Kota Restaurant in Porthleven

    Leave a Comment

    Over the Easter weekend we were lucky enough to visit chef Jude Kereama’s flagship restaurant Kota in the heart of coastal Porthleven, Cornwall. It was a truly phenomenal culinary experience that went beyond its Michelin Bib Gourmand and 3 AA Rosettes.

    If you want to extend your stay, Kota even has some gorgeous accommodation that can be found here and we thoroughly recommend exploring Porthleven and surrounding areas including Marazion (home to St Michael’s Mount!)

    We did the 6-course Tasting Menu with paired wines and thoroughly reccomend. Here’s what we had…

    Cocktails and Oysters 


    We kicked things off with some refreshing cocktails, one Yuzu Sake and Cucumber Martini (House infused wakame vodka, yuzu macerated sake, lime, sugar and cucumber), and one Kota Fizz (House infused cucumber vodka, elderflower liqueur, Prosecco, cucumber twist).

    Now, when you’re eating in a harbour on the Cornish coast, you absolutely must have oysters (or we think so anyway!) We ordered two of each, one a Tempura with baby gem, wasabi tartare, and pickled cucumber and the other a Natural oyster with rice wine cucumber granita, ponzu lime dressing. We were advised by the staff to ‘chew’ the natural oyster rather than the traditional ‘down in one’ approach to oysters and boy was it a treat! The granita was such an intense burst of flavour it really brought the oyster and its flavours of the sea to life. And this was just the beginning…


    Amuse Bouche


    The Miso Butter with the Amuse Bouche was another show-stealer and we could have had a whole starter portion of the soup which was zingy and had a great depth of flavour.


    Scallop


    The first course was a Scallop with crispy onions, leeks and XO Sauce. I’m not sure I’ve had XO Sauce before and it was a real delight. Sweet and spicy, it lifted the scallop and was one of my favourite dishes of the night – such an inspired combination of flavours!


    Venison Tartare & Katsu Panko Fish Goujon

    We parted ways on this course and had one meat option and one pescatarian. The first was a venison tartare, hazelnuts, apple, celeriac, gochujang dressing and the pescatarian alternative was a Panko coated white fish goujon, katsu curry sauce, carrot & daikon pickle. The apple and celeriac cut through the naturally rich venison deliciously whilst the goujon was hands down the best fish goujon we’ve had!


    Monkfish


    The favourite dish of the menu was the Monkfish dish: Crispy Kataifi wrapped monkfish, hake, lemongrass, kafir lime leaf & coconut bisque, yuzu saffron mayo. The bisque was velvety, and to-die-for whilst the Kataifi wrapped monkfish was unlike anything we’ve seen before. Just as with the cocktail back at the beginning, yuzu was used in such an inventive way, elevating all the flavours.


    Beef


    Next was a Moorland dry aged sirloin, short rib, beets, and horseradish. Just look at the colours on that plate! We think it speaks for itself! Such incredible flavours…


    Honey & almond cake


    Ok, coming up is one of the most interesting (and delicious) things we’ve ever tasted. We’d not had it before but the goat’s cheese sorbet was fantastic. It wasn’t too sharp, the sorbet was soft, and it was the perfect accompaniment to a honey-based cake. The whole dish consisted of lemon, thyme & honey syrup, goats cheese sorbet, and a walnut crumb. As if this wasn’t the perfect ending to an amazing tasting menu, there was more…


    Baked Alaska

    This chocolate, hazelnut & cherry baked alaska was delightful. The mousse inside was so light and technically really impressive. Served with a 10 year-old Tawny Port, it was a magical ending to the menu. The cherries and crumb gave such a satisfying crunch – a real, indulgent treat!

    Despite being very full, we still managed some delicious petit fours afterwards (see left).


    All in all…

    This is a meal we won’t be forgetting anytime soon. Jude’s team took such great care of us and we couldn’t recommend visiting Kota more. Check out the menu here and book now. There are lots of great options but if you can, go for the six course tasting menu. You won’t regret it!

  9. Lemongrass and Ginger Steamed Stonebass, Orange and Kaffir Butter Sauce, Pak Choi, Coriander and Bean Sprout Salad by Paul Welburn

    Leave a Comment

    Bursting with flavour, the fabulous Paul Welburn (Chef Patron at The Swan Inn, Islip) has concocted a wonderful seafood recipe of Lemongrass and Ginger Steamed Stonebass, Orange and Kaffir Butter Sauce, Pak Choi, Coriander and Bean Sprout Salad to showcase our Stainless Steel Multi Steamer.

    Equipment

    Copper Tri-Ply 20cm Saucepan

    Copper Tri-Ply 18cm Saucepan

    Copper Tri-Ply 24cm Non-Stick Frying Pan

    Ingredients

    Serves 4 as a main

    For the Brine:

    • 500g cold water
    • 75g light soy sauce
    • 25ml mirin

    For the Stone Bass:

    • 4 x 150g stone bass fillets
    • 2 x sticks lemon grass – split in half
    • 80g ginger – sliced
    • Maldon sea salt
    • 2 tsp rapeseed oil
    •  2 tsp chopped chives – sprinkle over when serving

    For the Orange and Kaffir Butter Sauce:

    • 2 x shallots, finely sliced.
    • 150ml fresh orange juice
    • 4 tbsp of white wine
    • 3 x kaffir lime leaves
    • 40ml double cream
    • 200g of salted butter, cut into small cubes.

    For the Pak Choi:

    • 2 x pak choi – split lengthways.
    • 1 tsp rapeseed oil
    • Maldon sea salt

    For the Salad of Bean Sprouts and Coriander & Dressing

    • 100g bean sprouts
    • 1 x bunch coriander or micro coriander cress
    • 2 tsp rapeseed oil
    • 2 tsp sesame oil
    • 2 tsp mirin
    • Juice of ½ lime
    • 2 tsp toasted sesame seeds

    Method

    Stone Bass:

    1. Mix the brine ingredients together.
    2. Place the bass portions in and leave for 20 minutes
    3. Remove, wash off in cold water and dry with kitchen paper.
    4. Place the portions onto squares of parchment paper until cooking.
    5. Place the pro ware steamer on top of the pan half filled with water.
    6. Bring it to the boil and turn down to a simmer
    7. Place the ginger and lemongrass onto the base of the steamer top, place the stone bass portions with the parchment on top and close the lid , cook on a medium heat for 6 minutes (steamer should not be rapid boiling )
    8. Once cooked remove from the steamer.
    9. Allow the fish to rest for 2 minutes.

    Orange and Kaffir Butter Sauce:

    1. Place the shallots, orange juice , white wine and lime leaves in a pan and reduce until almost dry
    2. Add the cream and bring to the boil.
    3. Remove the pan and add the butter whist whisking until the sauce thickens and your left with a smooth sauce
    4. Pass the sauce through a fine sieve and keep until required.

    Pak Choi:

    1. In a hot frying pan (or bbq)
    2. Place the oiled pak choi cut side down and cook on a medium heat on one side only
    3. Cook until the pak choi is golden but retains a crunch
    4. Season with salt and serve

    Bean Sprout and Coriander Salad:

    1. Whisk the dressing ingredients together
    2. Mix the bean sprouts and the coriander and just before serving toss in the dressing and serve

    To Serve:

    1. Peel back and Remove the skin from the bass
    2. Sprinkle over the chopped chives
    3. Place onto a serving plate
    4. Add the pak choi
    5. Spoon over the butter sauce over and around
    6. Lastly place the dressed salad of bean sprouts and coriander

    Wow… what a wonderful recipe! Thanks to this amazing Great British Chef!

  10. Vanilla rice pudding, pistachio honeycomb & glazed summer fruits by Josh Angus

    Leave a Comment

    Looking for a summery pud for your next date night dinner, sunday lunch, or dinner party? Look no further! Michelin Starred Hide Restaurant‘s Head Chef Josh Angus has created a super light and completely delicious dessert for you.

    Equipment

    Copper Tri-Ply 18cm Saucepan (with lid)

    Copper Tri-Ply 12cm Mini Frying Pan (to serve)

    Ingredients (Serves 5)

    (For the Rice Pudding)

    • 1 vanilla pod
    • 35g sugar (to taste)
    • 150g pudding rice
    • 900g milk
    • 165 double cream
    • 4 figs halved
    • 2 peaches quartered
    • Red wine
    • 75g sugar
    • 75g water

    (For the Honeycomb)

    • butter, for the tin
    • 200g caster sugar
    • 5 tbsp golden syrup
    • 2 tsp bicarbonate of soda
    • 50g chopped pistachios
    • 20g chopped pistachios for serving

    Method

    Make the Honeycomb first so it can rest…

    1. Butter a 20cm square tin. Stir the caster sugar and golden syrup together in a deep saucepan over a gentle heat until the sugar has melted. Try not to let the mixture bubble until the sugar grains have disappeared.
    2. Once completely melted, turn up the heat a little and simmer until you have an amber coloured caramel (this won’t take long) add your pistachios at this point, then as quickly as you can, turn off the heat, tip in the bicarbonate of soda and beat in with a wooden spoon until it has all disappeared and the mixture is foaming. Scrape into the tin immediately – be careful, the mixture will be very hot.
    3. The mixture will continue bubbling in the tin, simply leave it and in about 1 hr-1 hr 30 mins the honeycomb will be hard and ready to crumble or snap into chunks.

    For the Rice Pudding…

    1. Place the milk in a medium saucepan and add the rice and sugar. Split the vanilla pod lengthways with a sharp knife, scrape out the seeds and add both the pod and the seeds to the pan. Bring to the boil, then reduce to a simmer and cook gently with a lid on, stirring frequently, for 25-30 minutes or until the rice has absorbed most of the milk & cooked through. Remove the vanilla pod but save for presentation and stir in the cream. The rice  should be glossy now & fall off a spoon; leave to cool.
    2. Cut the figs in half & ripe peaches in to quarters, bring to boil the sugar & water in a frying pan to make stock syrup, once the sugar has dissolved add the peaches on a medium heat & cook for 1 minute either side just to soften the peach & glaze them up with stock syrup remove from pan.
    3. Add the figs & do the same but this time add two splashes of red wine & reduce to a syrup consistency. The figs & peaches should be slightly soft but hold their shape & not messy!
    4. To serve have the cooled  rice pudding on the bottom with the glazed fruit on top, sprinkle with chunks of honeycomb & chopped pistachios. Then drizzle with the red wine syrup.


    What a treat! We can’t thank Josh enough for this summer sensation. Check out his other recipes for us here.