Tag Archive: Mains

  1. Dunkertons Cider Chicken

    Comments Off on Dunkertons Cider Chicken

    This recipe is delicious! The creaminess of the sauce along with the sweet crispy topping of the apples is sure to be a crowd pleaser.  Apples are pressed in the autumn in order to make cider, however the key to a good cider is waiting. You must wait until at least February to start drinking it, and the longer you wait, to say June or July, the better it will taste.

    ProWares Hereford Cider Chicken

    We’ve suggested using Dunkertons Black Fox Herefordshire cider in this recipe. A 7% ABV medium dry cider which has a light fizz to it. It has a mellow flavour that is followed by a slight bitter-sweet bite. We consider it one of the most honest/authentic ciders on the UK market.

    The tenderness and flavour of the chicken is delightful. We hope you enjoy this recipe!

    Written by Corin

    Serves: 4

    Prep time: 15 minutes

    Cooking Time: 60 minutes


    Equipment


    Ingredients

    • 8 chicken thighs, skin on and bone in, seasoned with salt and pepper
    • 2 sweet eating apples, 1 peeled and cut in small chunks
    • 3 medium leeks, washed, trimmed and cut into 1 inch chunks
    • 3 cloves garlic, finely chopped
    • 500 ml dry cider/Dunkertons Black Fox Cider
    • 1 tablespoon of plain flour
    • 40 g of butter + a little olive oil
    • 1 teaspoon of sugar
    • 5 sprigs of thyme
    • salt and freshly ground pepper
    • 150 ml of double cream

    Cooking Method

    1. In the sauté pan, melt half the butter plus a little olive oil and gently brown the chicken thighs a few pieces at a time. When brown, remove from the pan and set aside on a plate until all chicken thighs have been browned.
    2. Add the garlic and the leeks to the oil/butter remaining in the pan and cook very gently for 10 minutes, turning over from time to time until soft.
    3. Turn up the heat slightly and add half of the apples to the pan with the leeks, just to brown the pieces a little bit.
    4. Now add the flour to the pan, stir for a minute or so to absorb the juices. Gradually add the cider, stirring as you go, so that no lumps form.
    5. Return the chicken to the pan and add 4 sprigs of thyme. Reduce to a very low heat, put the lid on and leave to cook on top of the stove for about 35-40 minutes.
    6. Remove the chicken from the pan again and set aside on a plate. Then simmer the pan juices until reduced by a third. Add the cream and allow to gently heat through. Season to taste with salt and freshly ground pepper.
    7. While this is heating through, peel and cut the second apple into chunks and sauté with the remaining butter in the small frying pan. Add the sugar to caramelise the apple pieces and cook until tender.
    8. Return the chicken to the pan again and dot with the caramelised apple and the leaves from the remaining sprig of thyme.
    9. Serve alongside some crusty bread, rice or potatoes and a side of vegetables, oh and you can’t forget a glass of lovely dry cider to wash it down with!
  2. Spaghetti and Meatballs

    Comments Off on Spaghetti and Meatballs

    This weekend the England Rugby squad take on Italy in their next match of the Six Nations Rugby tournament. We’ve created this Italian inspired recipe to enjoy while watching the game. To catch up on the previous recipes in this series check out our Côte de boeuf with herb butter which was created for their match against France and our Welsh Rarebit for their match against Wales last week, which if I might say was very exciting!

    This healthy but also quite hearty meal is perfect for everyone in the family. It’s a great way of getting children who don’t like eating vegetables to eat them as there are so many ‘hidden’ in this recipe. My daughter wouldn’t touch it if she knew what was really in it; she thinks it’s just tomatoes! We’ve used De Cecco spaghetti for this recipe which we love and you can find at most supermarkets in the UK.

    Image of Spaghetti and Meatballs Recipe - ProWare's Family Favourites

    The 26cm Copper Base Sauté pan was just the right size pan for making the sauce, with it’s deep sides it kept everything in and when left to simmer reduced down perfectly.

    Written by Fiona

    Serves: 5

    Prep time: 15 minutes

    Cooking time: 45 minutes


    Ingredients

    For the sauce:

    • 1 tablespoon of coconut oil or substitute other oil
    • 2 onions, chopped
    • 2 carrots, peeled and chopped
    • 2 sticks of celery, chopped
    • 2-3 cloves of garlic, diced
    • 1-2 yellow or red peppers, chopped
    • 300g of baby plum tomatoes, halved
    • 700ml of chicken or vegetable stock
    • 1 tablespoon fresh rosemary, chopped
    • 1 tablespoon fresh thyme leaves, removed from the stock
    • 1 teaspoon of turmeric
    • Salt and pepper for seasoning

    For the meatballs:

    • 3 tablespoons of rapeseed oil
    • 1kg of beef mince
    • 300g brown bread crumbs (use a food processor to make these from brown bread)
    • 2 eggs
    • Half a beef stock cube
    • 400g spaghetti
    • Parmesan cheese, grated

    Equipment


    Cooking Method

    1. Heat the coconut oil in the sauté pan over a medium-low heat until it is decently hot (a few minutes). Add onions and cook until they are nearly translucent.
    2. Add the carrots, celery, garlic and slowly soften for 10 minutes.
    3. Add the peppers, baby plum tomatoes, stock, rosemary, thyme, turmeric and then season with salt and pepper.
    4. Cook the sauce for 20 minutes.
    5. While the sauce is cooking make the meatballs by mixing the beef with the breadcrumbs, eggs, and the crumbled half stock cube.
    6. Make meatballs to your desired size. We made ours around the size of a golf ball.
    7. Heat the rapeseed oil in the frying pan until decently hot and then brown the meatballs, add them to the sauce and simmer for 20 minutes.
    8. Cook the spaghetti according to the instructions on the packet and serve with grated Parmesan cheese and a sprinkling of fresh thyme.
  3. Welsh Rarebit

    Comments Off on Welsh Rarebit

    Here is recipe number 2 in our Rugby Six Nations Recipe Collection. This weekend England take on Wales so we’ve got a tasty Welsh Rarebit Recipe for you to try. We’ve tweaked the traditional version by adding some finely chopped leeks, Henderson’s Relish and used Wild Raven which is a Black IPA from Thornbridge Brewery.

    ProWare Kitchen's Welsh Rarebit Recipe - Henderson's Relish - Thornbridge Brewery Raven beer

    Henderson’s relish is a bit of an institution here in Sheffield (see above photo from Waitrose Sheffield). Henderson’s has been made in Sheffield for over 100 years with locals lovingly referring to it as Hendo’s. Though it may look like Lea & Perrins Worcestershire Sauce, it is quite different in taste. This has struck many a debate not least in the Houses of Parliament ! Henderson’s is not fermented like Worcestershire sauce and does not contain anchovies making it suitable for vegetarians, and quite frankly…it’s better.

    ProWare Kitchen's Welsh Rarebit Recipe - Henderson's Relish - Thornbridge Brewery Raven beer

    We’ve also used Peak District based Thornbridge Breweries Wild Raven Black IPA. It adds a punch to this Welsh Rarebit recipe with it’s rich flavours shining through. As described on their website ‘The name of this beer is a tautology and the beer is complex and stunning. Five malts and six hops combine to provide bitter chocolate flavours with dark roasted fruits.’ Thornbridge’s beers are renowned for using a wide variety of malts and hops from all over the world which is in part how they’ve managed to win 200 industry and consumer awards for their beer.

    If you’ve never had Welsh Rarebit before or even if you have, give this recipe a go; it’s easy to prepare and the rarebit works well as left overs, though I doubt you’ll have any left. Enjoy!

    Written by Corin

    ProWare Kitchen's Welsh Rarebit Recipe - Henderson's Relish - Thornbridge Brewery Raven beer

    Serves: 6

    Prep time: 5 minutes

    Cooking time: 15 minutes 


    Ingredients

    • 1 x Sourdough Loaf, thickly sliced (we used 2 slices per person)
    • 1 medium leek, finely chopped
    • 4 tablespoons butter
    • 2 tablespoons all purpose flour
    • 1 teaspoon mustard powder
    • 150 ml Thornbridge Black IPA, or other available dark stout/ale
    • 2 teaspoons Henderson’s relish
    • 225 g strong cheddar cheese, grated
    • Sea salt and freshly ground pepper to taste
    • Serve with Henderson’s Relish

    Equipment


    Cooking Method

    1. Toast the sourdough slices in an oven or toaster and set to one side.
    2. Melt the butter in the saucepan over a medium heat and reserving 1 tablespoon of leeks for garnish, gently fry the remaining leeks for 5 minutes to soften yet not brown.
    3. Once leeks are cooked through, stir in the flour and the mustard powder then gradually stir in the beer. Once all the beer is added bring to a simmer.
    4. Stir in the cheddar cheese mixing well until it is melted then season with sea salt and freshly ground black pepper.
    5. Remove from heat and let the rare bit cool slightly in the saucepan. If you add the rarebit when it is very hot it will likely make your bread soggy. At this point preheat your grill setting on your oven.
    6. Now generously spoon on the rarebit to the toast and add a dash of Henderson’s relish on the top. Place under the grill for 5 minutes, keeping an eye on it all the while to ensure it doesn’t burn.
    7. Remove from the oven and serve straight away with a garnish of finely chopped leeks and lashings of Henderson’s Relish.
  4. Côte de boeuf with herb butter

    Comments Off on Côte de boeuf with herb butter

    Some say the Six Nations Championship is without a doubt the world’s greatest rugby tournament. Every year the fans of these six nations – England, France, Ireland, Italy, Scotland and Wales – partake in the thrill and excitement of this pageant of world class rugby.

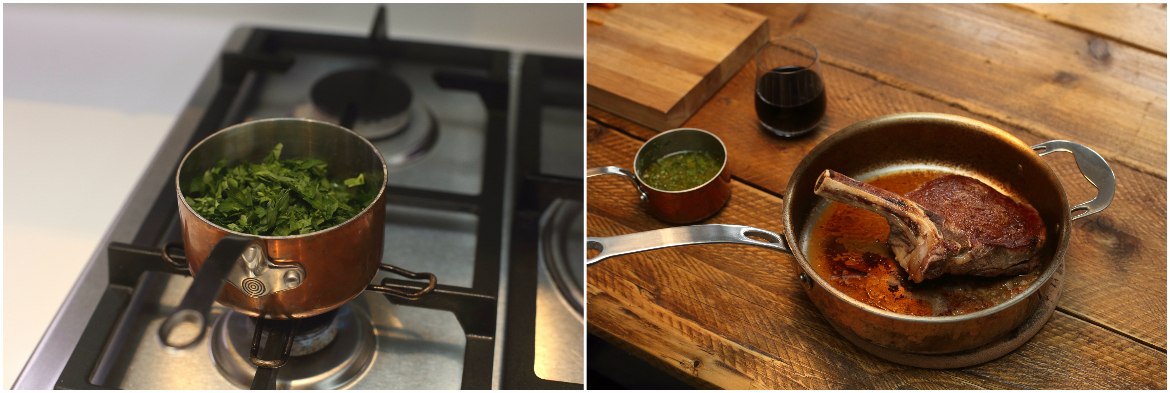
    ProWare's Cote-de-boeuf-prep

    To get in the spirit of the tournament we’ve created a dish for each match based on England’s opponent so you’ve got a new recipe to devour each weekend. On Saturday the England Rugby Squad take on France at Twickenham Stadium in the first match of their Six Nations fixture. To start our collection of recipes off we’ve selected this indulgent Côte de boeuf. Côte de boeuf is a simple dish which is full of flavour and bound to impress your guests. We’ve used a 30 day dry aged Hereford Côte de boeuf which is available at Waitrose or Ocado though you should be able to find this bone in beef cut at a butcher too.

    Our Copper Tri-ply Sauté Pan is the perfect pan for this recipe.  The copper exterior heats up so quickly and the aluminium interior holds the heat efficiently without hot spots making this pan ideal for searing the beef. When it’s time to place the beef into the oven there is no need to transfer it to an oven tray just place the lid on the pan and pop it in the oven. Be careful when removing the pan as it will be extremely hot, so always use oven gloves. The stainless steel interior of the pan is a great non-reactive and hygienic surface but oil and beef fat may stick the pan after cooking, however do not fret! Fill the pan with hot soapy water and leave for 15 minutes before cleaning. Also, if you want to restore the shiny exterior of your Copper Tri-ply pan try one of our polishing methods here or enjoy the ever changing shades of the penny brown copper colour.

    Written by Robert

    Image of ProWare's Cote de boeuf mini pan

    Serves: 2

    Prep time: 4 minutes

    Cooking time: 14 minutes


    Ingredients

    • 1 x Hereford Côte de boeuf, approximately 650g
    • Maldon Sea Salt
    • Drizzle of olive oil
    • 25g fresh flat leaf parsley, chopped
    • 1 garlic cloves, finely chopped
    • 80g butter
    • 1 teaspoon Dijon mustard

    Equipment


    Cooking Method

    1. Preheat oven to 220°C/428°F.
    2. Sprinkle salt on both sides of the beef.
    3. Heat Sauté Pan with a drizzle of olive oil until it moves around the pan swiftly and starts separating. This means it’s hot enough for you to add the beef.
    4. Add the beef to the pan and let it sear for 2 minutes. Then flip it and sear for a further 2 minutes on the other side.
    5. Place the lid on the Sauté Pan and put the pan into the oven for 10 minutes for a rare finish or 12 minutes for medium rare flipping the beef half way through the cooking time.
    6. Meanwhile, melt the butter in a Mini Pan and once melted add the finely chopped garlic, then a minute later the chopped parsley and mustard. Stir to combine then cook for 3 minutes further before removing from heat.
    7. Remove the beef from the oven when desired finish is reached.
    8. Slice the Côte de boeuf then enjoy it with a Silver Mini ladle full of garlic butter and with sweet potato or regular chips.
  5. Balsamic Pear and Smoked Bacon Salad

    Comments Off on Balsamic Pear and Smoked Bacon Salad

    This recipe was given to us by the first runner up in our Autumn recipe competition; Helen Huxley’s Balsamic Pear and Smoked Bacon Salad. This salad is packed with seasonal flavour. The savoury and sweet ingredients make this light meal a real treat for the taste-buds.

    This is why Helen loves this recipe:

    “This is a quick and tasty recipe for when you want a salad and something warm but not anything stodgy. It is easy to prepare and nice with crusty bread. Split into 4 portions and serve as a starter at a dinner party, have it is a fantastic lunch or a quick supper!”

    Balsamic Pear Salad

    Serves: 2

    Prep time:  5 minutes

    Cooking time: 10 minutes 


    Ingredients

    • 50g pine nuts, toasted
    • 6 rashers of smoked, streaky bacon, chopped
    • 1 pear, halved then quartered
    • 2 tablespoons balsamic vinegar
    • 2 teaspoons honey
    • 100g blue cheese
    • Mixed salad leaves, to fill 2 bowls

    Equipment


    Cooking Method

    1. Begin by toasting the pine nuts in a mini frying pan and then set aside.
    2. Chop the bacon, dry fry until crisp and then remove from pan.
    3. Core and chop the pear in half, chop each half into quarters and then place these into a larger frying pan.
    4. As the pears are browning add the balsamic vinegar and honey and leave to reduce. Once reduced return the bacon and pine nuts to the pan to warm.
    5. Fill 2 bowls with mixed salad leaves and then pour the bacon and pear mixture, along with the hot dressing, over the leaves.
    6. Finish by crumbling 50g of blue cheese over each bowl and enjoy!
  6. Roasted Vegetable Orzo Pasta

    Comments Off on Roasted Vegetable Orzo Pasta

    This Roasted Vegetable Orzo is one of my favourite dishes. Like this Fresh Tomato Pasta I have made it so many times it’s second nature now. What I love about it is all you have to do is prep the vegetables and leave them to bake in the oven, make the lemon garlic dressing, then boil the Orzo and mix everything together. I’ve made this recipe for a large crowd before which proved really easy due to the lack of hands on time and had many compliments. Orzo, if you’re not familiar with it, looks like rice in appearance but is really a form of short cut pasta and can be found at most supermarkets. It’s very versatile and great in pasta salads too.

    Image of ProWare's Roasted vegetable orzo prep

    We’ve been having some lovely weather this autumn. Luna, one of ProWare’s pooches, has been making the best of it soaking in the sunshine while I’ve been able to snap some photos outside using the fabulous light.

    Image of ProWare's Roasted vegetable orzo in roasting trays

    If you want to make this recipe vegan, omit the feta cheese and perhaps add in a handful or two of sliced olives. I often replace the feta in recipes with olives, especially when I have my vegan friends around for dinner. Olives have a very similar taste to feta due to the saltiness of them.  The garlic lemon dressing in this recipe really amplifies the flavours of the vegetables and brings a light citrus flavour to the pasta.


    Written by Corin

    Serves: 8 

    Prep time: 10 minutes

    Cooking time: 40 minutes 


    Ingredients

    For the roasted vegetables

    • 1 medium aubergine, cut into 2cm cubes
    • 3 red, yellow or orange peppers, quartered
    • 4 shallots, quartered
    • 250g cherry tomatoes, halved
    • 4 tablespoons olive oil
    • Salt and pepper

    For the Orzo

    • 400g Orzo
    • 400g Feta cheese, crumbled
    • 10-15g fresh basil, chopped
    • 10-15g fresh parsley, chopped
    • 3 tablespoons pine nuts, toasted

    For the garlic lemon dressing

    • 3 tablespoons olive oil
    • Juice of 1 lemon
    • 2 garlic cloves pressed or finely chopped
    • 1/4 teaspoon and more to taste
    • Generous pinch of chilli flakes
    • Freshly ground pepper to taste

    Equipment


    Cooking Method

    1. Preheat oven to 200°C/400°F.
    2. Arrange the aubergine, peppers and shallots between the two roasting trays, drizzle over 3 tablespoons of the oil and season with salt and pepper. Stir to combine.
    3. Place in the oven for 40 minutes, stirring them after 20 minutes and then adding the halved tomatoes to each tray then add a little bit more olive oil and seasoning. Return to oven to roast for the remaining 20 minutes. At this point bring water to boil in a large saucepan and add Orzo with about 5 minutes left on roasting time, stirring immediately to avoid sticking. Cook according to package instructions.
    4. Check and remove the vegetables from the oven when they are cooked and the tomatoes are tender and slightly wrinkled.
    5. Dry toast the pine nuts in a mini pan or other small saucepan/frying pan until slightly browned, remove from heat and set to one side.
    6. Once the orzo is cooked, strain water through a fine sieve or colander. Now place the orzo into your large bowl, adding the garlic lemon dressing mixing well. Next add the roasted vegetables, Feta cheese, pine nuts then lastly the fresh herbs. Mix well and check the seasonings. Add more salt/pepper and red chilli flakes if desired. Serve straight away.
  7. One Pot Vegetarian Chilli

    Comments Off on One Pot Vegetarian Chilli

    This Vegetarian Chilli is an easy, one pot recipe that is full of flavour, low in fat and packed with protein. Serve it with rice, a jacket potato, or sweet potato wedges along with a slice of lime, sliced chilli’s and chopped fresh coriander. Alternatively, in warmer weather, serve simply with a salad. A stockpot is perfect for this recipe as it can go straight from the kitchen to the table for people to help themselves. The Chilli freezes really well so left-overs are not a problem.

    Written by Jayne

    Kids in the Kitchen

    Chopping – The peppers and any additional veg you’d like to add to this chilli need chopping. A fun way to do some chopping, especially with peppers is to use small cookie cutters! Then use a knife to chop the left over pieces. The best way to do this is cut the flesh off the pepper in 4 flat panels, then us a cookie cutter from there fitting in as many shapes as you can. If you don’t have small cookie cutters, don’t worry, use a larger one and cut the finish pieces in half or quarters before cooking.

    Measuring – Let the kids measure out the rest of the ingredients, either using the teaspoons/tablespoons or a scale depending on ingredient. For older children you can talk about the different between ml and grams. Why are ml used for liquids and grams used to measure solids? Ask them to ponder this question and try and find the answer themselves!

    ProWare's Veggie Chilli Ingredients in our Copper Tri-ply Stock pot

    Serves: 5 

    Prep time: 5 minutes

    Cooking time: 30-35 minutes


    Ingredients

    • 2 tablespoons vegetable oil
    • 1 large onion, chopped
    • 1 large or 2 smaller red, orange yellow or green peppers
    • 1 x 400g tin of tomatoes
    • 1 x 400g tin of red kidney beans
    • 1 x 400g tin of chick peas, drained and rinsed
    • 2 cloves of garlic, crushed
    • 2 teaspoons chilli powder (or more if you like it hotter)
    • 1/2 teaspoon ground cumin
    • 2 tablespoons tomato puree
    • Approximately 200ml of vegetable stock (fresh or from a stock cube)
    • 2 tablespoons (vegetarian) gravy granules if a thicker sauce is preferred. (We used Bisto which is surprisingly vegetarian!)
    • 350g Quorn mince
    • Any left-over mushrooms or fresh tomatoes can be added if desired
    • Salt and freshly ground pepper to serve
    • A slice of lime, chopped chillis and fresh coriander to serve

    Equipment


    Cooking Method

    1. Heat the oil in a stockpot and cook the onion and pepper over a medium heat until soft.
    2. If you have any mushrooms and fresh tomatoes add these and cook over a low heat for approximately 5 minutes.
    3. Add the rest of the ingredients except the Quorn, stir to combine and let simmer for 10-15 minutes to allow the flavours to infuse.
    4. If needed, add the gravy granules to thicken the sauce.
    5. Add the Quorn and once the mixture is back to a simmer cook for a further 5-10 minutes.
    6. Serve with desired side and topping. Enjoy!
  8. Autumn Venison and Pheasant Stew

    Comments Off on Autumn Venison and Pheasant Stew

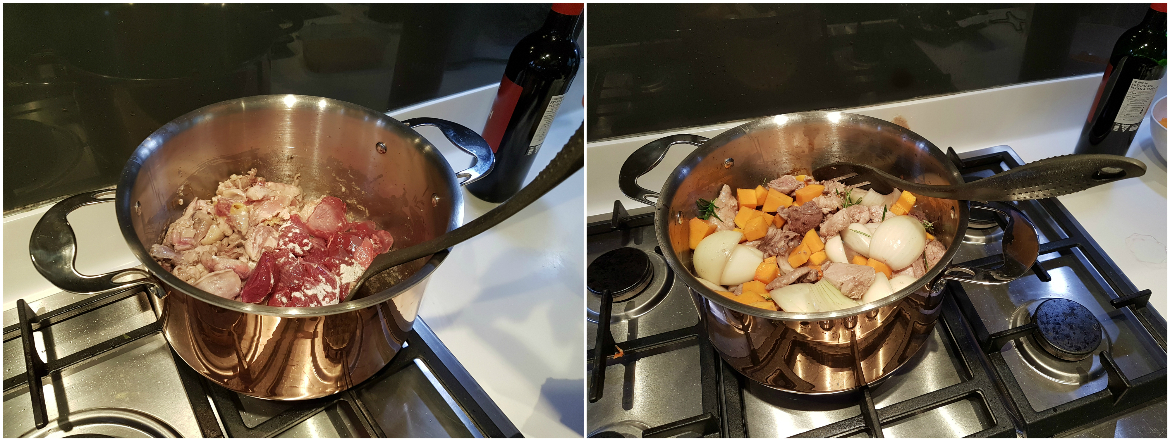
    Pheasant has just come into season and when combined with a bit of venison and a splash of red wine it makes for a hearty stew. Recently game has been growing in popularity as an alternative to more everyday meats and can be bought at Marks and Spencers as well as Sainsbury’s. This is likely to be a combination of it’s versatility and nutritional benefits as it tends lower in fat and rich in iron. The butternut squash is added in two stages in order to allow the initial batch to break down and add body to the stew. I used butternut squash as that is what I had to hand, but pumpkin and acorn squash are also in season and would add a sweet richness to the stew as well.

    Written by Robert

     Image of ProWare's autumn venison and pheasant stew

    Serves: 6
    Prep time: 20 minutes
    Cooking time: 2.5 hours


    Ingredients

    • 250g Venison, boned
    • 400g Pheasant, boned
    • 2 tbsp of flour
    • 2 tbsp vegetable oil
    • 3 cloves of garlic
    • 1 butternut squash
    • 1 onion
    • 1 parsnip
    • 2 carrots
    • 300ml red wine
    • 600ml chicken stock
    • 2 bay leaves
    • 1 teaspoon peppercorns
    • Handful chopped rosemary
    • Salt and freshly ground black pepper

    Equipment


    Cooking Method

    1. Preheat the oven to 150°C.
    2. Dice the venison and pheasant and then toss lightly in flour.
    3. Peel and finely slice the garlic. Peel all the vegetables. Dice the butternut squash, quarter the onion and cut the parsnip and carrot into chunky batons.
    4. Heat the oil in the base of the stock pot, add the garlic and fry for 30 seconds. Add the meat and brown over a high heat.
    5. Once the meat is browned reduce the heat and push it to one side of the stock pot. Add the onion and gently sweat them for 3-4 minutes.
    6. Add half of the butternut squash along with the wine, stock, bay leaves and the rosemary.
    7. Season with salt & pepper to taste. Cover and place into the pre-heated oven for an hour and a half.
    8. Remove the pan from the oven, stir the stew and then add the other half of the butternut squash, the parsnip and the carrots.
    9. Cover and then place back in the oven for a further hour.
    10. Remove from the oven, check the seasoning, serve with a sprig of rosemary on top, some sourdough bread and a glass of bold red wine.


  9. My Mum’s Kedgeree

    Comments Off on My Mum’s Kedgeree

    I’ve got a feeling that this recipe might be a bit controversial because it isn’t a traditional kedgeree – this version of the dish doesn’t use the spices that you might find in other recipes. The result is that the sweet, smoky flavour of the fish really gets chance to shine! This kedgeree is a really family-friendly dish which is easy to prepare ahead.

    ProWare - Kedgeree prep photo

    We’ve included a picture of two types of smoked haddock – one bright yellow and the other plain. The yellow haddock is more traditional but the colour comes from a dye rather than the smoking process. I bought the un-dyed haddock used in this recipe from Ocado, it is kiln smoked rather than ‘liquid smoked’. The un-dyed haddock feels slightly less processed so I chose to use that over the dyed but it really does come down to personal preference!

    Written by Faye

    Collage of ProWare's Kedgeree

    Serves: 4
    Prep time: 20 minutes
    Cooking time: 45 minutes


    Equipment


    Ingredients

    • 200g basmati rice
    • 2 tablespoons vegetable oil
    • 1 onion, diced
    • 4 rashers of streaky bacon, sliced into ‘lardons’ *omit to make this recipe pescatarian*
    • 100g frozen peas
    • 250g smoked haddock fillet
    • 300ml milk
    • 2 bay leaves
    • 1 teaspoon peppercorns
    • 250g cooked prawns
    • 4 tablespoons yoghurt
    • 4 large eggs
    • Handful chopped parsley
    • 15g butter
    • 2 spring onions
    • Salt and freshly ground black pepper

    Cooking Method

    1. Rinse the rice two or three times with cold water. Place rice in the 18cm saucepan with 600ml water, bring to the boil, cover and simmer for 10 minutes or until most of the water has gone. Turn off the heat and cover.
    2. Meanwhile gently fry the onions until soft, adding the bacon and fry for a further 3 – 4 minutes until the bacon is cooked.
    3. Place the haddock into a sauté pan with the milk, bay leaves and peppercorns. Bring to the boil, then remove from the heat and cover.
    4. Pre-heat the oven to 180°C/350°F.
    5. Boil eggs in the milk pan for 6 mins. Immediately as they are removed from the boil plunge the eggs under cold water to stop them cooking, remove the shells.
    6. Drain the fish, discarding the milk, the bay leaves and the peppercorns. Remove any skin and flake into chunks.
    7. In the sauté pan combine the rice, the onion, the bacon and the peas stir to combine.
    8. Gently stir through the fish, prawns, yoghurt and half of the parsley.
    9. Slice or break up the eggs and place sections on top of the rice.
    10. Add a few knobs of butter to the top of the dish.
    11. Bake in the oven for 10 – 15 minutes or until warmed through.
    12. Remove from the oven, dress with the sliced spring onions and the remaining parsley. Add salt and pepper to taste then serve!
  10. Wild Rice Bowl with Fried Egg and Peanuts

    Comments Off on Wild Rice Bowl with Fried Egg and Peanuts

    The brown and wild rice used in this dish is not only healthy but makes for a filling yet light meal. We love the flavour that the Chinkiang Black Rice Vinegar adds to the rice. It is easily found at Chinese Grocery stores, but you can substitute regular rice vinegar instead.

    Written by Robert

    Serves: 4

    Prep time: 5 minutes

    Cooking time: 5 minutes (plus 30-40 minutes for rice to cook)


    Ingredients

    • 4 spring onions, thinly sliced
    • 2 cups cooked brown and wild rice (1 cup uncooked rice)
    • 1 tablespoon of Chinkiang Black Rice Vinegar
    • 2 tablespoons of soya sauce
    • Salt and freshly ground pepper
    • 3 tablespoons of peanut oil for frying
    • 4 eggs
    • 1 avocado, sliced
    • 4 tablespoons peanuts
    • Hot sauce for serving (we like Sriracha)
    • 1 tablespoon of Sesame seeds
    • Drizzle of sesame oil (optional)

    Equipment


    Cooking Method

    1. If using uncooked rice, cook the rice either in a rice cooker or sauce pan to the instructions on the package.
    2. Dry toast the peanuts in the frying pan until slightly browned, remove to a separate dish.
    3. Once the rice is cooked or warmed, mix in the vinegar, soya sauce, sliced spring onions and season with salt and pepper to taste.
    4. Heat the peanut oil in the frying pan until decently hot then fry the eggs 2 at a time, for about 1 minute a side seasoning with salt and pepper then flip and fry for a further 30 seconds. This will yield a runny yolk.
    5. Divide the rice into bowls and top with eggs, peanuts, avocado, a sprinkle of sesame seeds, hot sauce and a drizzle of sesame oil.