Tag Archive: Vegan

  1. Spiced Rice Pudding with Pistachios, Raspberries and Date Syrup

    Comments Off on Spiced Rice Pudding with Pistachios, Raspberries and Date Syrup

    Ready to go in 30 minutes, this dessert is versatile, punchy, and will leave you wanting more! Low maintenance, with a simmer time of 25 minutes, this Spiced Rice Pudding with Pistachios, Raspberries and Date Syrup can be adapted to suit your tastes. We love cinnamon, cardamom and nutmeg, but why not add bananas or dessicated coconut? Great for a post Sunday Roast dessert, or a weeknight treat, cook it up now!

    We used whole milk and double cream but you could make it vegan with nut or oat milk and vegan cream! The double cream is also optional so leave it out for a healthier alternative!

    We used our Stainless Steel Base Milk Pan for this recipe. Check out all the things we love about the range here.

    Spiced Rice pudding in a white bowl, served on a tray with a flower. A Proware Stainless Steel Base pan is in the background.
    You’ll really feel like spring has sprung with this delicious dish!

    Serves: 4
    Prep time: 5 minutes
    Cooking time: 25 minutes


    Ingredients

    • 600ml whole milk
    • 100g pudding rice
    • 1x cinnamon stick
    • 30g caster sugar
    • ½ tsp vanilla essence
    • ¼ tsp ground cardamom
    • ⅛  tsp nutmeg (pinch)
    • ⅛ tsp ground clove (pinch)
    • pinch of salt
    • 100ml double cream (optional)
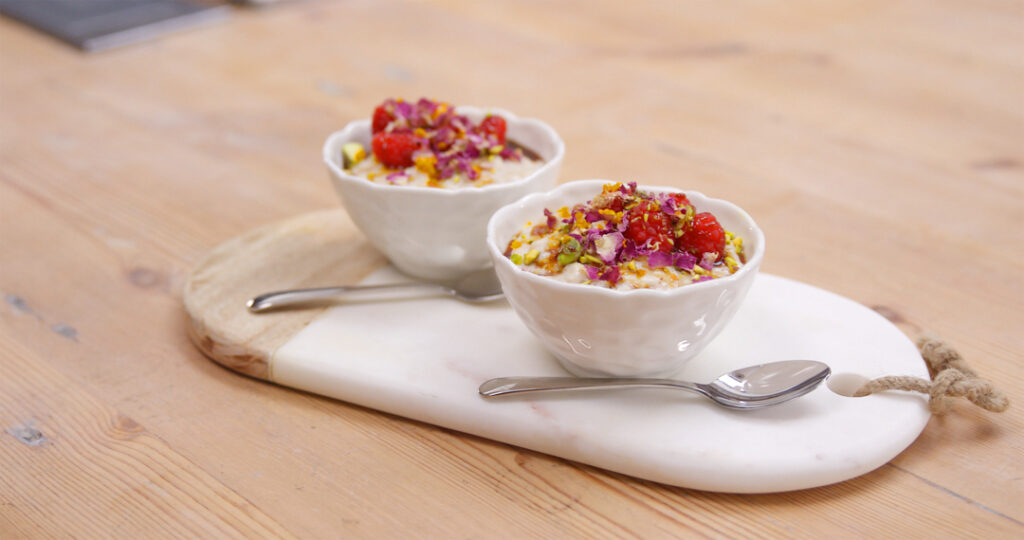
    • 40g pistachios, chopped
    • 1 tsp dried rose petals
    • 20 raspberries
    • 1 tsp orange zest
    • 1 tbsp date syrup

    Equipment

    A pair of bowls with spiced rice pudding served topped with raspberries and dried rose petals and pistachios
    Dessert for two

    Cooking Method

    1. Place the milk in a medium saucepan and add the rice, sugar and cinnamon stick, spices and vanilla essence and salt. Bring to the boil, then reduce to a low, gentle simmer stirring regularly for 25 mins or until the rice has absorbed most of the milk.
    2. Take off the heat, remove the cinnamon stick and stir in the double cream
    3. Garnish with the pistachios, dried rose petals, raspberries and grate over the orange zest. Drizzle over the date syrup

    If you add your own toppings, we’d love to hear about the changes you make. Get in touch on our social media pages!

  2. Pickled Vegetables by Jöro

    Comments Off on Pickled Vegetables by Jöro

    This recipe for quick pickled vegetables is effortless, but the end result is a refreshing addition to any plate. Jöro serve these vegetables alongside their Cured Wild Sea Trout recipe and they complement the fish wonderfully. This type of pickling doesn’t require canning, as you tend to use them with a week or so. In addition to this, you can adapt this recipe to use pretty much any vegetable you would like.

    Serves: 6+

    Prep time: 10 minutes

    Resting time: 1 day


    Ingredients

    • 300g white wine vinegar
    • 200g water
    • 100g caster sugar
    • 10g dried kombu seaweed (available from health food shops mostly)
    • 1 carrot
    • 5 baby onions
    • 1 leek, white/light green part only discarding the dark green tops
    • 1 turnip
    • (any vegetables you like really!)
    • table salt

    Equipment


    Method

    1. Place the vinegar, water, seaweed and sugar in a pan and bring to the boil, season with a pinch of salt to taste.
    2.  Meanwhile, clean and peel the vegetables and cut into desired shapes.
    3. Once the pickling liquid has come to the boil, remove from the heat and allow to cool slightly, before pouring over the vegetables, then leave to pickle for at least 1 day before using.
  3. Chilean Bean Stew with Tomato Salad

    Comments Off on Chilean Bean Stew with Tomato Salad

    This Chilean Bean Stew (also known as Porontas Granados ) with Tomato Salad is my husband’s favourite vegan meal. Coming from a big meat eater, I think that might mean something. I’ve made this recipe many times before; for family, vegan/vegetarian friends and also big dinner parties too and the feedback is always really good often with people asking for the recipe…so here goes!

    ProWare's Chilean Bean Stew

    I love this recipe as it’s hearty yet somewhat light when served with a topping of tomato salad. It is the perfect post exercise recipe as you can make it before if you want and heat it up when you get in. It’s fairly quick to make though as far as stew’s go because of the lack of meat you don’t need to slow cook it for very long.

    Ingredients Chilean Bean Stew, butternut squash, leeks, corn, basil, tomatoes, red pepper, coriander, onion, lime

    Also, this recipe is fabulous made in the autumn when pumpkin and squash are in season, so do give a go in the next few weeks. I can guarantee you won’t be disappointed.

    Written by Corin


    Serves: 6

    Prep time: 15 minutes

    Cooking time: 30-40 minutes


    Ingredients

    Chilean Tomato Salad

    • 5 ripe plum tomatoes, sliced
    • 1 medium red onion, thinly sliced
    • 4 tablespoons olive oil
    • 2 tablespoons fresh lime juice
    • handful of chopped coriander
    • salt and freshly ground pepper
    1. Arrange the tomatoes and red onions on a large plate or bowl.
    2. Whisk the lime juice and olive oil together and season with salt and freshly ground pepper to taste.
    3. Pour evenly over the top of the salad and garnish with chopped coriander.

    Stew

    • 4 tablespoons olive oil
    • 1 medium onion, chopped
    • 1 red pepper, chopped
    • 2 leeks, cut in half lengthwise then cut in thin semi circles
    • 1 tablespoon smoked paprika *can substitute regular paprika but the smoked variety adds a wonderful flavour
    • 1 tablespoon dried oregano
    • 1/2 teaspoon ground black pepper
    • 1 tablespoon fine polenta
    • 450g peeled, deseeded and cubed pumpkin *can substitute butternut squash or similar
    • 3 corn cobs, kernels chopped off the cob
    • 400g can of butter beans, drained and rinsed
    • 400g can haricot beans, drained and rinsed
    • 725ml vegetable stock
    • Handful of chopped basil leaves
    • Salt to taste

    Equipment

    • Knife
    • Chopping board
    • Stock pot or heavy based casserole
    • Wooden spoon
    • Peeler

    Cooking Method Stew

    1. Heat the oil in the stockpot over a medium heat, once hot add the onion, pepper and leeks sautéing until soft.
    2. Stir in the paprika, oregano, black pepper and polenta then add the pumpkin, corn, drained beans and vegetable stock.
    3. Bring to a gentle boil and simmer until the pumpkin is soft but not breaking down.
    4. Stir occasionally to prevent sticking and add a little more water if necessary. The sauce will become thick and hearty.
    5. Add the chopped basil and season to taste.
    6. Serve in a bowl topped with Chilean salad and chopped coriander leaves.
  4. Salted Chocolate Vegan Tart with Pistashios and Coconut Cream

    Comments Off on Salted Chocolate Vegan Tart with Pistashios and Coconut Cream

    This Salted Chocolate Vegan Tart is so delicious I cannot begin to tell you! It’s really important to use a good quality dark chocolate when making this recipe as you can really taste the difference. In the ProWare office of late we haven’t been able to get enough of Seed and Bean’s salted vegan chocolate. So we decided to make it into a tart!

    Image of ProWare's Chocolate VeganTart 2

    This tart’s base is a more ‘biscuity’ base, not to be confused with Masterchef’s ‘buttery biscuit base song‘ as we’ve used soya margarine to keep it vegan. And really, this recipe is all about the rich chocolate filling! We’ve also paired it alongside coconut cream which is very versatile. The recipe is based on Ashley Rodriguez’s recipe for Coconut Rhubarb Creamsicles (which is amazing by the way!). To make the coconut cream more thick we’ve removed the coconut water by placing the can in the fridge beforehand. Coconut cream is great served on top of fruit salad, in a Victoria sponge cake, as a topping on Chia Seed Pudding and even as a replacement for whip cream on a latte!

    Written by Corin

    Serves: 8

    Prep time: 5 minutes

    Cooking time: 10-15 minutes

    Chill time pastry: 60 minutes

    Chill time filled tart: 5-6 hours


    Ingredients

    For the filling

    • 200ml soya milk
    • 150ml water
    • 4 tablespoons sugar
    • 1 tablespoon cornflour
    • 1 teaspoon vanilla extract
    • 255g dark salted vegan chocolate (we used Seed and Bean’s salted dark chocolate)
    • If not using salted chocolate add 1/2 teaspoon fine sea salt
    • 2-3 tablespoons pistachios, chopped

    For the biscuit pastry base

    • 250g plain flour
    • 125g icing sugar
    • 1 teaspoon vanilla extract
    • 125g cold soya margarine

    For the coconut cream (optional)

    • 1 can full fat coconut milk
    • 2 tablespoons caster sugar
    • 1 teaspoon vanilla extract

    Equipment


    Cooking Method

    1. Place a can of coconut milk in the fridge with the side of the can you are going to open facing upwards. Let chill for 1 hour then open the can and carefully pour away the liquid into a bowl or glass. A thick coconut cream will remain in the can. Put this into a medium bowl and whisk together with the sugar and vanilla. Cover then put back in the fridge until you’re ready to eat the tart.
    2. For the pastry sift the flour and icing sugar into a large bowl.
    3. Chop the margarine roughly then add it to the dry ingredients by rubbing it into the flour/icing sugar quickly. Add the vanilla extract and add enough water slowly, little by little stirring with a wooden spoon until it is able to be made into a ball.
    4. Wrap the dough in Clingfilm and put in the fridge to chill for 30 minutes.
    5. When it is nearing the end of the 30 minutes, preheat the oven to 180ºC/350ºF/Gas 4.
    6. Remove the pastry from the fridge and roll out on a floured surface so that it is 1/2 cm in thickness. Then line the tin with the pastry.
    7. Once the tin is lined with the pastry cut a piece of grease proof paper so it over hangs the tin slightly then place your ceramic baking beans inside. Blind bake the pastry in the oven for 15 minutes with another piece of grease proof paper over top of the tart. This will stop the edges from browning too much.
    8. After the blind bake, remove the weight/beans and bake for a further 10-15 minutes. Remove from the oven when it is golden brown and cooked through. The dough is very much like a biscuit base rather than flaky pastry.
    9. Combine the soya milk and water in the milk pan and bring it to a gentle simmer over a low to medium head. In a small bowl mix the cornflour with a few tablespoons of soya milk then return to the milk pan and stir to combine. Bring the mixture to a gentle boil.
    10. Break the chocolate into the medium sized bowl and pour over the hot soya mixture, stirring to combine. Add the vanilla extract and extra sea salt if not using salted chocolate. Pour in the pastry and refrigerate for 5-6 hours.
    11. Chop 2 tablespoons of pistachios and scatter over the chocolate tart before serving and serve with a dollop of coconut cream.


  5. The Ultimate Chia Seed Pudding

    Comments Off on The Ultimate Chia Seed Pudding

    For some of you Chia Seed Pudding may be ‘so last year’ or even 5 years ago for that matter, but I’ve only this year discovered Chia seeds/Chia seed pudding and I am definitely an enthusiast. Despite being so tiny, these little seeds are packed with good stuff. They’re full of antioxidants, omega 3’s, calcium, protein and fibre. Chia Seed pudding is a great way to start your day, as a healthy snack or even a dessert. Below are a couple of my favourite ways to top Chia Seed Pudding, but feel free to experiment with different fruits, nuts and toppings to your taste – that’s the fun part!

    Written by Corin

    Serves: 1-2

    Prep time: 5-10 minutes

    Waiting time: 30 minutes – 1 hour


    Ingredients

    For the pudding:

    • 3 heaped tablespoons chia seeds
    • 1 cup plant milk (coconut milk drink, oat milk, almond milk, soy milk etc)
    • 1 teaspoon vanilla essence

    Method

    1. Place the chia seeds in a bowl or container. Add the plant milk along with the vanilla. Mix with a fork or whisk until incorporated. Leave to rest for 5 minutes then stir again thoroughly. Now leave for 3o minutes to an hour, or overnight in the fridge.
    2. Distribute chia pudding into bowls/glasses or mason jars, whatever you’d like to eat them from. Then using the garnish ideas below begin mixing/ topping/garnishing your pudding. Enjoy!

    Types and Garnish Options

    Chia Seed with Mango, Coconut flakes, Banana and chopped almond

    Mango Ginger Breeze

    • Fresh ginger, finely chopped (best to mix this in at the chia seed and plant milk stage)
    • 1/4 cup canned coconut milk
    • Half of a mango, chopped into bite sized pieces
    • 1 small banana, chopped
    • A small handful almonds, roughly chopped
    • 1 tablespoon unsweetened desiccated coconut flakes
    • Drizzle of vanilla syrup

    Chia Pudding with Kiwi Nectarine and Banana

    The Rise and Shine

    • 1 nectarine, sliced
    • 1 small banana, sliced
    • 1 kiwi sliced
    • 1/4 cup canned coconut milk
    • A small handful almonds, roughly chopped
    • 1 tablespoon unsweetened desiccated coconut flakes
    • Dusting of Matcha (Green Tea Powder), optional

    Chocolate Chia seed with strawberries and nut butter

    Cacao Strawberry Blast

    • 1 tablespoon cacao or coco powder thoroughly mixed into the ready chia pudding
    • 1 tablespoon maple syrup
    • 3-4 strawberries, sliced
    • 1 tablespoon (per person) nut butter
    • Top with cacao nibs or grated dark chocolate

    Chia Seed pudding with pineapple and coconut cream

    The Colada

    • 1/4 of a pineapple, cut into bite sized pieces
    • Dollop of coconut cream (this is made from 1 can of coconut milk, pour out the liquid and only use the thick coconut cream. Add 2 tablespoons of caster sugar and 1 teaspoon of vanilla. Mix well and refrigerate for at least 15 minutes before using.)
    • 1 tablespoon unsweetened desiccated coconut flakes
    • A few mint leaves, chopped
    • Drizzle of vanilla syrup
    • Top with small handful of almonds or macadamia nuts, chopped

    ProWare's Chia Pudding Lean and Green Toppings, kiwi and hemp hearts

    Lean and Green

    • 1 avocado, 2 dates, 1/4 cup plant milk and 1 teaspoon matcha powder, use a blender to combine
    • Top with a small handful of chopped almonds, sliced kiwi, a sprinkle of hemp hearts and chopped mint leaves.

    Chocolate with Sauteed Banana

    • 1 tablespoon cacao or coco powder mixed in with the chia seeds and plant milk
    • 1 banana, sliced and sprinkled with a tiny bit of caster sugar each side
    • Lightly toast 1-2 tablespoons of unsweetened desiccated coconut flakes in a ProWare 24cm Frying Pan, remove into separate dish
    • Heat 2 tablespoons of coconut oil in the frying pan and fry the banana until lightly golden on each side
  6. Guacamole for a Crowd

    Comments Off on Guacamole for a Crowd

    My friends and I can’t seem to get enough of guacamole at the moment. Someone brings it to every gathering or get together we have. We have it with tortilla chips, freshly cut vegetables, flat bread, anything really. This recipe can be served as a snack for a group of people or split between a few people as more of a main. BUT Avocados can be expensive, so give your local markets a try as they sometimes have amazing deals. My friends swear by the Moor Market in Sheffield if you’re local. Also a great way to save is to buy them on offer. The avocados I’ve used in this recipe are from the co-op but were reduced and perfectly ripe, bar one which was slightly too far gone.

    guac 2

    Another safe bet with avocados, as timing can be tricky, is frozen avocados. Yes, you can freeze avocados! This is fab if you buy a bunch at a market or on offer, just make sure to remove the stone and skin before freezing. Even more exciting is that Tesco stock bags of frozen avocado halves at a pretty reasonable price too. (Quick Tip – these are in with frozen vegetable, not fruit section!) Perfect for keeping in the freezer for your last minute avocado needs. I must admit I’ve even defrosted them slightly in the microwave or in a freezer bag in some warm water, when in a hurry to use them.

    This recipe is packed with so much vegetable goodness it’s unbelievable. The seasonal foods for June we’ve used are tomatoes, garlic, red onions and coriander, as well as carrots and courgettes served alongside to dip in the guacamole.

    Written by Corin

    Serves:  A crowd as a side dish/dip or 2-3 as a light meal
    Prep time: 15 minutes


    Ingredients

    • 4 medium/large ripe avocados, stones and skin removed then flesh chopped
    • 100g cherry tomatoes, quartered
    • 1 stick celery, finely chopped
    • Half of any colour pepper, chopped
    • 1/2 -1 small red onion or 1 shallot, finely chopped
    • 1 clove garlic, crushed or finely chopped
    • 2 tablespoons fresh coriander, chopped
    • juice from 2 limes
    • Half of a small chilli pepper, or a pinch of chilli flakes
    • 1/2 teaspoon ground turmeric
    • season to taste with sea salt and freshly ground black pepper

    Equipment


    Cooking Method

    1. Place the chopped avocado in the bowl or saucepan. Mix in the onion, pepper, celery, garlic, coriander, lime juice, chilli or flakes and ground turmeric. Mix well and season with salt and pepper to taste.
    2. Then lastly add the tomatoes and mix gently to incorporate.
    3. Serve with warmed flat bread, parathas (Indian Flat Bread), tortilla chips, or sliced vegetables (carrots, cucumber, peppers, courgette, snap peas etc).


    We’re linking up with the below blogging events. Check them out for more tasty recipe ideas:

    No-Waste-Food-Challenge-logo-2b


    Elizabeth’s Kitchen Diaries – No Food Waste Challenge June and July’s host Utterly Scrummy

    fb_simpleandinseason_logo


    Katie from Feeding Boys – Simple and In Season

    credit-crunch-munch-just-pic1


    Fab Food 4 All & Fuss Free Flavours – Credit Crunch Munch hosted this month by Lovely Appetite

    meat free mondays


    Tinned Tomatoes Meat Free Monday’s 7 Recipes for the Week.

  7. Caramelised Sesame Peanuts

    5 Comments

    I don’t know if you’re like me, but I have a basket of packages of half used seeds, nuts, dried fruit and grains in my cupboard, some of which have been there for so long it’s slightly embarrassing! It is very good though if you are making your own granola as you can throw in pretty much anything and it still tastes great.

    collage

    The other day my husband came home from the supermarket with these Caramelised Sesame Peanuts which were so moreish it made me upset because the package was way too tiny, a measly 80g! I looked at the ingredients and thought ‘I can make these’. In fact, I could make them that very moment thanks to my lovely basket of miscellaneous packages and that’s what I did. I had some raw unsalted peanuts which I bought ages ago to use as a topping for homemade Pad Thai, which were begging to be used. The result was really similar, I would say that the store bought version is slightly sweeter, but I prefer to err on the side of making things healthier if I can so I am happy with the result. Also, the store bought version had honey on the ingredients list, but I swapped this for a mix of maple syrup and coconut sugar.

    Feel free to experiment with whatever nuts and seeds you have lurking in your cupboards and I hope you enjoy!

    Written by Corin

     Caramelised Sesame Peanuts 2

    Makes:  300g

    Prep time: 2 minutes

    Cooking time: 20 minutes 


    Ingredients

    • 300g unsalted raw/plain peanuts
    • 1-2 tablespoons sesame seeds
    • 2 tablespoons maple syrup (substitute honey)
    • 65g coconut sugar (substitute white or brown sugar)
    • Half a teaspoon of crushed or fine sea salt (I used vanilla flavoured sea salt)

    Equipment


    Cooking Method

    1. Preheat oven to 170°C.
    2. Place the peanuts in a bowl, add in all other ingredients and mix well.
    3. Line baking tray with silicone mat or grease proof paper and pour nuts onto tray. Spread the nuts out as much as you can.
    4. Bake in oven for 10 minutes, stirring at this point, then for a further 10 minutes keeping an eye on them to make sure they don’t burn. Remove from oven, let cool slightly if you can and enjoy!


  8. Trio of Christmas Vegetables

    Comments Off on Trio of Christmas Vegetables

    This trio of Christmas vegetables is a fantastic option for your festive dinner. The vivid, jewel-like colours of the red cabbage, carrots and sprouts will make an enticing accompaniment to any center-piece. Obviously we think that the best way to serve the vegetables is in our mini pans! We put portions for two into each mini-pan and served them on wooden trays designed to be shared.

    The red cabbage is sauteed in red wine vinegar. The pine nuts & sweet, juicy raisins balance against the vinegar to create a lovely ‘sweet & sour’ flavour.

    We chose not to over complicate things with the carrots and the sprouts … the carrots were lightly boiled and dressed with parsley butter. The sprouts were sparingly trimmed and boiled in salted water for about 5 minutes so that they kept their vibrancy in terms of flavour, colour & crunch.

    Written by Faye

    Trio of Vegetables collage 1


    Red Cabbage with Pine Nuts and Raisins

    Serves: 6 as a side dish

    Prep time: 5 minutes

    Cooking time: 30 minutes


    Ingredients

    • ½ head of red cabbage, sliced
    • 3 tablespoons olive oil
    • 50g raisins
    • 50g pine nuts
    • 75ml red wine vinegar
    • Salt to taste

    Equipment


    Cooking Method

    1. Soak the raisins in the red wine vinegar.
    2. Gently toast the pine nuts in a dry pan, over a medium heat, until they just start changing colour.
    3. Boil the red cabbage for 5 – 7 minutes. Drain & set aside.
    4. Heat the olive oil in the saute pan and add the cabbage. Saute for 5 minutes over a medium heat.
    5. Turn up the heat and add the raisins and the red-wine vinegar. Use the wooden spoon to scrape in any of the ingredients that have caramelised on the base of the pan.
    6. Turn the heat down to a simmer, add the pine nuts and cover.
    7. Allow the cabbage to cook down for 20 minutes, stirring occasionally.
    8. Salt to taste and serve in a mini pan.
  9. Simple Apple Sauce

    Comments Off on Simple Apple Sauce

    This simple apple sauce is a fabulously festive condiment, perfect for serving alongside pork. It is finished with a very simple lemon twist and crumbly, dried lemon zest! It will keep in the fridge for a few days and will freeze for months so can easily be made in advance.

    Written by Faye

    Makes approximately: 300-500g depending on the size of your apples

    Prep time: 5 minutes

    Cooking time: 6 minutes


    Ingredients

    • 3 cooking apples, peeled, cored and quartered
    • 3 tablespoons sugar (or to taste)
    • Juice of one lemon
    • Zest of one lemon

    Cooking Method

    1. Pre-heat oven to 180°C.
    2. Place the cooking apples and sugar into a microwaveable dish with a splash of water.
    3. Cover the dish and microwave on a high heat for 4 minutes.
    4. Add the lemon juice to taste. If necessary, add a little more sugar.
    5. Put the lemon zest onto an oven proof dish and dry in the oven for 2 – 3 minutes.
    6. Crumble the zest over the top of the sauce, adding a lemon twist to garnish.
  10. Hasselback Potatoes

    Comments Off on Hasselback Potatoes

    First developed by chefs at the Restaurant Hasselbacken in Stockholm, these little beauties will impress even the most discerning guest. They can be prepared the night before, just leave them to soak in the fridge overnight. The sunflower or vegetable oil will take on a high temperature for roasting, really helping to crisp the potatoes up. The fan-like cuts to the top of the potatoes gives a deliciously tempting crunch which contrasts with the fluffiness of the roast potato.

    It is definitely worth checking out Jamie Oliver’s divine recipe for Hasselback Potatoes served with Gorgonzola and honey.

    Written by Faye

    Serves: 6 as a side dish

    Prep time: 20 minutes (plus 30 minutes soaking time)

    Cooking time: 60 minutes


    Equipment


    Ingredients

    • 1.5kg Maris Piper or King Edwards (we used whole potatoes, we picked through to find potatoes that were about the size of eggs), peeled
    • 4 tablespoons sunflower or vegetable oil
    • 3 teaspoons of table salt for the salted water
    • Sea salt to taste

    Cooking Method

    1. Carefully slice a series of cuts into the top of the peeled potatoes. Try to cut about 2/3rds of the way into the depth of the potato.
    2. Soak the potatoes in salted water for 30 minutes then drain & pat dry.
    3. Meanwhile pre-heat the oven to 200°C.
    4. Add the oil to a large roasting pan and place in the pre-heated oven for 3 – 4 minutes.
    5. Carefully add the potatoes to the roasting pan, tossing them gently to ensure that they are covered in oil.
    6. Turn the potatoes so that the cut sides are facing upwards. Season with salt.
    7. Roast for approximately one hour, basting occasionally. The potatoes will turn a tempting golden brown colour.
    8. Sprinkle with a little more sea salt and perhaps some pepper to serve.