A sumptuous steak dish, cooked in garlic and fresh rosemary. Perfect served along side a salad which makes an easy go-to recipe. However you like your steak, it’ll be mouth-watering in this garlic butter!
Put the olive oil in the stainless steel frying pan and heat over high heat until hot.
Place the steak in the centre of the frying pan. Cook until desired doneness. We cooked ours rare which took about 1.5 minutes per side depending on the thickness of the steak. Cooking with stainless steel interior pans can take some practice. For example, when cooking meat, if the pan is properly preheated and the oil is hot when the steak is added you need not move it again until it is time to turn it. The meat will seal beautifully and you will be able to lift it from the pan easily, if you try to move it too soon you run the risk of tearing the flesh. For more information check out our blog Non-stick vs Stainless Steel.
In the last minute of cooking add a tablespoon of butter, sliced garlic and rosemary sprigs. Remove steak when done and let rest on a plate. Continue to move garlic around in the pan with rosemary for another minute or until brown, adding the additional tablespoon of butter if desired and then serve with the steaks.
Bursting with flavour, the fabulous Paul Welburn (Chef Patron at The Swan Inn, Islip) has concocted a wonderful seafood recipe of Lemongrass and Ginger Steamed Stonebass, Orange and Kaffir Butter Sauce, Pak Choi, Coriander and Bean Sprout Salad to showcase our Stainless Steel Multi Steamer.
For the Salad of Bean Sprouts and Coriander & Dressing
100g bean sprouts
1 x bunch coriander or micro coriander cress
2 tsp rapeseed oil
2 tsp sesame oil
2 tsp mirin
Juice of ½ lime
2 tsp toasted sesame seeds
Method
Stone Bass:
Mix the brine ingredients together.
Place the bass portions in and leave for 20 minutes
Remove, wash off in cold water and dry with kitchen paper.
Place the portions onto squares of parchment paper until cooking.
Place the pro ware steamer on top of the pan half filled with water.
Bring it to the boil and turn down to a simmer
Place the ginger and lemongrass onto the base of the steamer top, place the stone bass portions with the parchment on top and close the lid , cook on a medium heat for 6 minutes (steamer should not be rapid boiling )
Once cooked remove from the steamer.
Allow the fish to rest for 2 minutes.
Orange and Kaffir Butter Sauce:
Place the shallots, orange juice , white wine and lime leaves in a pan and reduce until almost dry
Add the cream and bring to the boil.
Remove the pan and add the butter whist whisking until the sauce thickens and your left with a smooth sauce
Pass the sauce through a fine sieve and keep until required.
Pak Choi:
In a hot frying pan (or bbq)
Place the oiled pak choi cut side down and cook on a medium heat on one side only
Cook until the pak choi is golden but retains a crunch
Season with salt and serve
Bean Sprout and Coriander Salad:
Whisk the dressing ingredients together
Mix the bean sprouts and the coriander and just before serving toss in the dressing and serve
To Serve:
Peel back and Remove the skin from the bass
Sprinkle over the chopped chives
Place onto a serving plate
Add the pak choi
Spoon over the butter sauce over and around
Lastly place the dressed salad of bean sprouts and coriander
Wow… what a wonderful recipe! Thanks to this amazing Great British Chef!
Looking for a summery pud for your next date night dinner, sunday lunch, or dinner party? Look no further! Michelin Starred Hide Restaurant‘s Head Chef Josh Angus has created a super light and completely delicious dessert for you.
Butter a 20cm square tin. Stir the caster sugar and golden syrup together in a deep saucepan over a gentle heat until the sugar has melted. Try not to let the mixture bubble until the sugar grains have disappeared.
Once completely melted, turn up the heat a little and simmer until you have an amber coloured caramel (this won’t take long) add your pistachios at this point, then as quickly as you can, turn off the heat, tip in the bicarbonate of soda and beat in with a wooden spoon until it has all disappeared and the mixture is foaming. Scrape into the tin immediately – be careful, the mixture will be very hot.
The mixture will continue bubbling in the tin, simply leave it and in about 1 hr-1 hr 30 mins the honeycomb will be hard and ready to crumble or snap into chunks.
For the Rice Pudding…
Place the milk in a medium saucepan and add the rice and sugar. Split the vanilla pod lengthways with a sharp knife, scrape out the seeds and add both the pod and the seeds to the pan. Bring to the boil, then reduce to a simmer and cook gently with a lid on, stirring frequently, for 25-30 minutes or until the rice has absorbed most of the milk & cooked through. Remove the vanilla pod but save for presentation and stir in the cream. The rice should be glossy now & fall off a spoon; leave to cool.
Cut the figs in half & ripe peaches in to quarters, bring to boil the sugar & water in a frying pan to make stock syrup, once the sugar has dissolved add the peaches on a medium heat & cook for 1 minute either side just to soften the peach & glaze them up with stock syrup remove from pan.
Add the figs & do the same but this time add two splashes of red wine & reduce to a syrup consistency. The figs & peaches should be slightly soft but hold their shape & not messy!
To serve have the cooled rice pudding on the bottom with the glazed fruit on top, sprinkle with chunks of honeycomb & chopped pistachios. Then drizzle with the red wine syrup.
What a treat! We can’t thank Josh enough for this summer sensation. Check out his other recipes for us here.
One of our favourite pieces, our Stainless Steel Tri-Ply 35cm Roasting Pan was put to the test by Hide‘s Head Chef Josh Angus recently and look what a culinary masterpiece he concocted! If you thought cooking octopus at home might be inaccessible, then think again with Josh’s recipe…
150g edamme beans or broad beans popped & blanched if needed
1 cucumber sliced at angle
Green or black olives (optional)
4 tbsp Red wine vinegar
½ Lemon juice
5 tbsp good olive oil
Salt to taste
500g new potatoes
5 cloves garlic finely chopped
15g Rosemary chopped
Salt to taste
Method
Turn the oven on 170c full fan, once the octopus is fully defrosted. Give the octopus a rinse under the sink. Then cut the octopus in half having 4 tentacles either side, place in the cast iron dish with the roughly chopped vegetables & a splash of white wine. (optional)
Cover with greaseproof & foil, then put in the oven & cook for 2 to 3 hours until the octopus is completely cooked through & not chewy! A knife should easily go through the octopus.
The meantime chop the new potatoes in half or quarters if large, mix in a bowl with olive oil, salt, chopped rosemary & chopped garlic.
Roast potatoes in the oven for 35mins same temperature as octopus until really crispy & cooked through. Mix time to time in the oven so they become really crispy.
For the salad wash the chickpeas under cold running water & mix with chopped feta, tomatoes, broad beans & cucumber. Dress the salad with olive oil, vinegar, lemon juice & salt to taste.
Once the octopus is cooked & rested for 20 minutes, take each tentacle & detach them from the head individually, then grill them in hot pan with splash of olive oil to get crispy on the outside, 2 minutes on each side will be enough.
Serve immediately with the hot crispy potatoes & cold Greek salad. Also could serve with aioli or romesco sauce as a dip.
We can’t get enough of this recipe, perfect for a summer dinner party with friends who love seafood. Thanks Josh!
Head Chef Brad Carter of Carters of Moseley has used our brand new Stainless Steel Multi Steamer to whip up these Korean inspired Fried Chicken and Kimchi Baos with a kick!
Brad used our Copper Tri-Ply range and you can see what we love so much about it here.
Here’s how you can make them yourself…
Equipment needed for the Fried Chicken and Kimchi Bao
18-20 dim sum papers or cut out circles of baking parchment
Ingredients
(For the Chicken)
500g Cotswold white chicken thighs, boneless, skinless, cut into bao sized pieces
200g plain flour
75g cornflour
25g rice flour
15g korean red chilli flakes
salt to season
rapeseed oil for frying
Ingredients
(For the Mayonnaise)
200ml kewpie mayonnaise
1 tbsp gochujang paste
To garnish
2 tsp toasted sesame seeds
4 spring onions, sliced ultra thin
Method (Kimchi)
Firstly start with the kimchi.
Cut the chinese leaf into quarters keeping the root attached, then rub in the salt.
Put the leaves into a container & pour over cold water just to cover, leave the cabbage at room temperature for 2-3 hours.
Drain the water away from the cabbage & ring the leaves out to remove as much of the water as possible.
Taste the leaves to see how salty they are, this will deter how much salt you add to the rest of the recipe.
Mix the remaining kimchi ingredients together in a bowl & add either 1 tablespoons of salt or the full 2 tablespoons depending on how salty the leaves were tasting, then mix everything into a paste, add to the chinese leaves, rubbing the paste all over the leaves & into the layers.
Add the leaves to a large kilner jar or vaccum pack bag (if you have the luxury!) and lay the quarters into the jar or bag, upright & add the excess paste, seal the jar or bag & leave to ferment at 28c-30c for around 10 days.
Method (Bao)
Fast forward 10 days & now it’s time to make the bao.
Mix all of the dry ingredients for the Bao dough together & add the water.
Knead for around 3 minutes, add it to a lightly oiled bowl, cover and let it prove for 2 hours at room temperature.
After 2 hours, roll out the dough into a long sausage shape, about 3cm thick, then cut into pieces that are about 3cm wide, you will probably have more buns than you need but don’t worry- you can freeze them if you do!
In the palm of your hand, roll each piece of dough into a ball and leave to rest for 2-3 mins.
Use a dumpling rolling pin to roll out each ball, one by one, into an oval shape about 3-4mm thick. Rub the surface of the dough ovals with oil and brush a little oil over a chopstick.
Place the oiled chopstick in the centre of each oval. Fold the dough over the chopstick, then slowly pull out the chopstick.
Lay out the dim sum papers or baking parchment and put a bun on each. Transfer to a baking tray, cover with a clean tea towel or lightly oiled cling film and leave to prove in a warm place for 1 hr, or until doubled in size.
Set the buns aside to reheat later & the excess buns can be cooled & frozen.
Method (Chicken)
For the chicken, heat 2cm of oil in a deep sided frying pan to around 180c.
Season the chicken all over with the salt.
Mix together the flours & chilli flakes with a whisk then dredge the chicken pieces into the flour mix, fry the chicken in batches turning occasionally for around 5-6 minutes, remove the chicken with tongs & drain on kitchen paper.
Whisk together the kewpie mayonnaise & the gochujang in a mixing bowl & transfer to a squeezy bottle.
To assemble the bao buns, steam the buns for 1-2 minutes in the bamboo basket & remove.
Add the chicken to the bun & dress with an equal amount of kimchi alongside it, squeeze a healthy amount of mayonnaise over the chicken & sprinkle with the sesame seeds & the spring onions then shove it it in your big, drooling mouth.
Why not try it at home? Thanks so much for Brad for this amazing recipe. What are you waiting for? Head over to our online shop to purchase your Steamer now!
Comments Off on Artichoke Orzotto with Toasted Pine Nuts by Great British Chefs
We are delighted to bring you this comforting main course recipe of Artichoke Orzotto with Toasted Pine Nuts. It’s so easy to prepare and the orzo is a wonderful alternative to rice.
280g of artichoke hearts, (approx. 1 jar of marinated artichokes in oil)
70g of unsalted butter
1 leek, finely sliced
3 garlic cloves, sliced
150ml of white wine
300g of orzo
800ml of vegetable stock
1 handful of soft herbs, chopped (we used parsley, chives and tarragon)
80g of Parmesan, grated
1 lemon, zested
Cooking Method
Melt 20g of the butter in a saucepan and sweat the leeks and garlic until soft but without colour. Add a pinch of salt.
Add the orzo to the pan followed by the wine. Reduce by half.
Once the wine has reduced, add the warm stock, a ladle at a time, until the orzo is cooked through. Wait for the stock to be absorbed by the orzo before adding another.
As the orzo is cooking, place two-thirds of the artichokes in a blender along with the oil. Reserve the remaining third to fold through at the end. Blend the the artichokes to a smooth and creamy purée, adding a splash of water if needed. Taste and season with salt.
Once the orzo is just cooked, fold through the puree and stir through until warmed.
Turn off the heat and fold through the Parmesan and remaining butter. Place a lid on the pan and leave to sit for 5 minutes before serving.
As the risotto rests, toast a handful of pine nuts in a hot dry pan until golden.
To serve
To finish, stir through plenty of fresh herbs and some lemon zest and garnish with the toasted pine nuts.
Comments Off on Pan-fried Lemon Sole with Tomato, Olive and Caper Sauce by Great British Chefs
This tomato, olive and caper sauce is the perfect accompaniment to the delicate flesh of the lemon sole. A sprinkle of parsley and flaky sea salt is all that’s needed to add the finishing touch. Serve with seasonal steamed greens or a salad on the side.
Add a knob of butter to a nonstick frying pan and gently fry the onion, garlic and anchovies until the anchovies have started to melt into the butter and the onion and garlic is soft and translucent.
Add the capers and fry for a further minute.
Add the tomatoes and olives and simmer on a low heat until the tomatoes collapse into a sauce.
In the meantime, lightly dust the fish with flour on both sides and season.
Place another nonstick frying pan over a high heat and add a splash of oil. Once hot, carefully place the fish, top-side down, into the pan. Cook for around 3 minutes or until the fish is starting to turn golden round the edges.
Flip the fish over and cook for 2–3 minutes before adding cubes of butter. When the butter is melted and foaming, tilt the pan towards you and use a spoon to baste the butter back over the fish.
Remove the fish from the pan and drizzle over the browned butter. Leave to rest for a few minutes.
To serve
Taste the sauce and add salt if needed (the anchovies will have seasoned it to an extent). Stir most of the chopped parsley into the sauce then spoon out onto a serving plate.
Top with the fish and a further sprinkle of parsley and flaky sea salt.
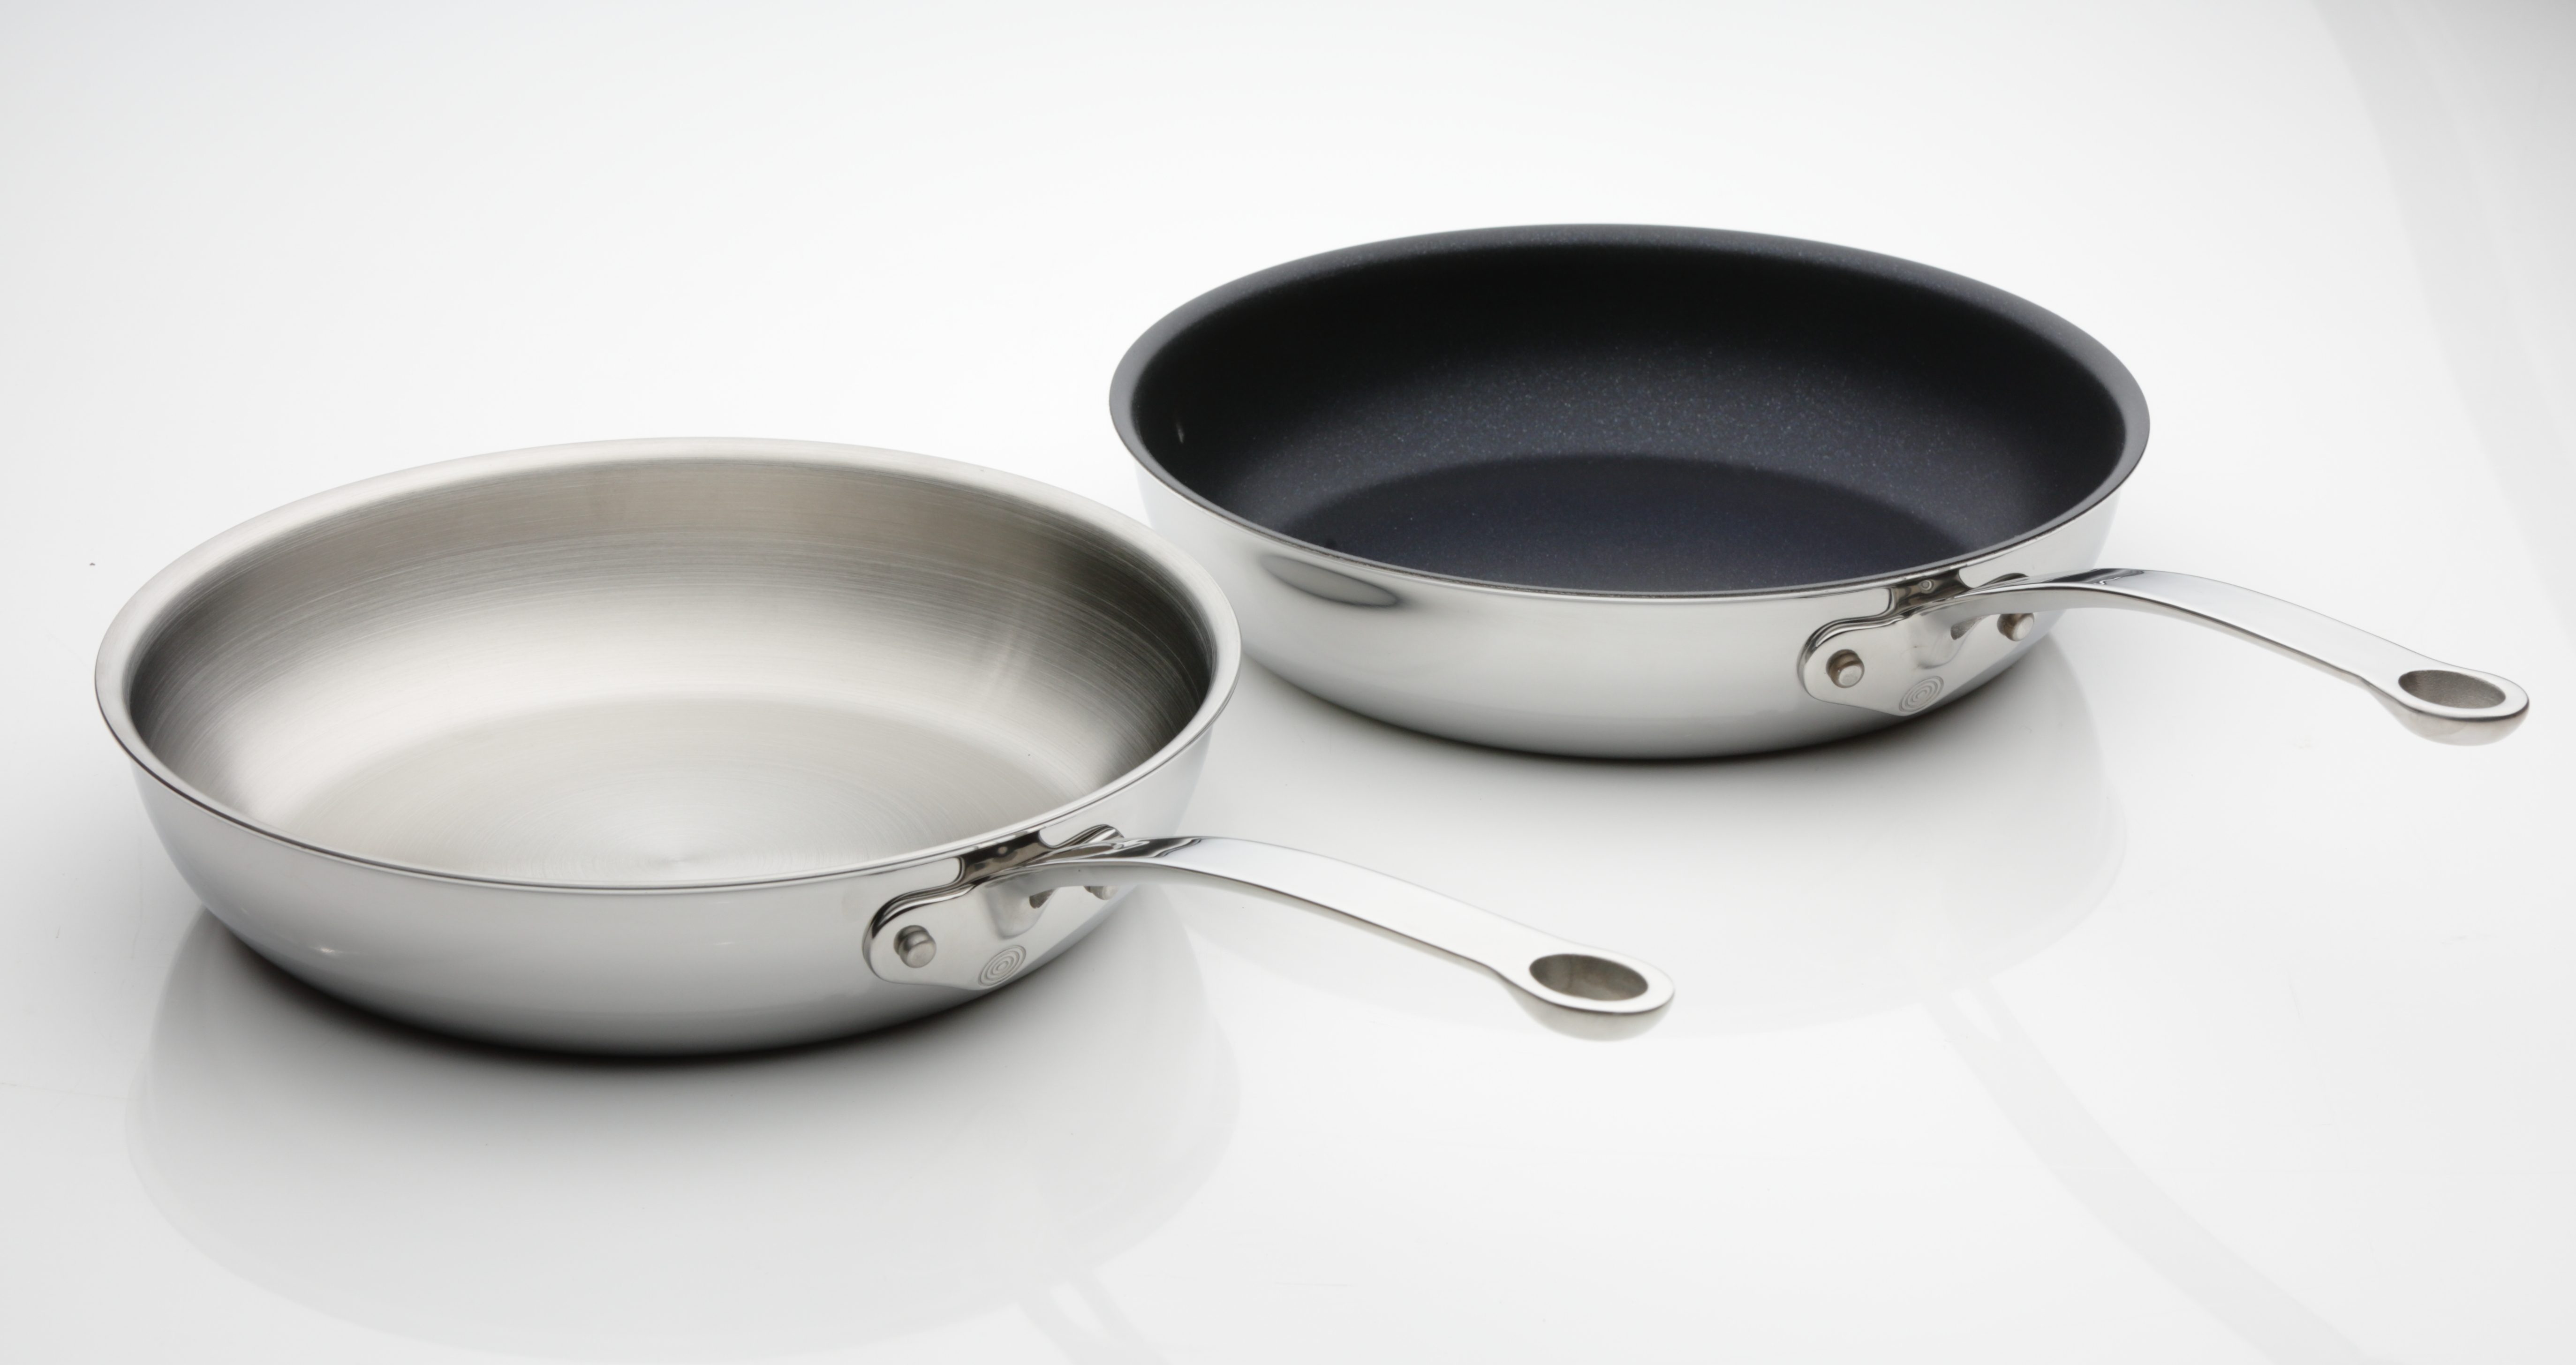
Comments Off on New Induction Compatible Frying Pans!
INTRODUCTORY OFFER: 20% off all our Frying Pans this August Bank Holiday Weekend!
With prices starting at just £35 you will never be without the right tools for the job! Check them out here.
20cm – Perfect for smaller hobs, individual omelettes, toasting nuts and seeds.
24cm – Easy to handle and ideal for 2-3 servings, frying eggs and proteins such as fish, chicken, and vegetables such as asparagus and corn on the cob.
28cm – Versatile pan when cooking for a larger family. Perfect for cuts of meat and fish for sharing.
Not only do they look amazing these induction compatible pans are designed with a perfectly flat base to ensure maximum contact with your hob surface.
The three-layer construction provides superior heat distribution for precise cooking control.
They have a highly polished stainless steel exterior and are dishwasher and oven safe to 260°C*.
The handles are attached using heavy duty stainless steel rivets which provide lifelong durability and have been designed to stack perfectly taking up less room in your pan drawers!
They come with and without Platinum Plus Non-Stick coating to cater for all of your culinary needs.
Comments Off on 7 Things We Love About Our Stainless Steel Tri-Ply
Last December we were delighted to launch our Stainless Steel Tri-Ply range. We have now had a couple of months to live with them and see how the pans perform in the real world. The team here at ProWare have had a discussion about what they like most about them and this is what we came up with, we hope you agree!
1 Efficiency
A totally flat base ensures excellent hob contact
These pans are designed with a perfectly flat base to ensure maximum contact with flat hobs and reduce ambient heat loss. This means they are very responsive to changes in heat, quickly achieving a rolling boil or settling down to a simmer. The Tri-Ply construction allows them to perform at their best on all hob tops (find out more here).
When developing the Stainless Steel Tri-Ply 14cm Milk Pan and 24cm Frying Pan, we decided to offer the choice of non-stick or not (read more about the benefits of each here). Each has its pros and cons. Consequently, each perform some tasks better than others. If you’re going to use you frying pan for fried eggs and crepes, go for non-stick. Conversely, if you intend to make lots of sauces using a metal whisk, a 14cm saucepan without non-stick would be preferable. Another bonus is that the entire range is oven safe!
3 Durability
Our stainless steel rivets are secured with 200 tonnes of pressure
When we develop a new product, the approach we take when deciding on a specification level is to ask ourselves ‘what would we want in our own kitchen?’ With a wall thickness of 2.5mm and cast stainless steel handles, these pans both look and feel extremely robust. In addition, our handles are secured using stainless steel rivets pressed with 200 tonnes of pressure. Most manufacturers use more cost effective aluminium rivets however, these are softer than stainless steel and can deform if repeatedly banged causing handles to loosen. We offer a lifetime guarantee on every element of the cookware with the exception of the non-stick coating.
4 Aesthetics
Hanging loops mean these pans don’t have to be confined to the cupboard
We have established that there is more to these pans than just a pretty base (get it?…anyone?), but we couldn’t talk about our Stainless Steel Tri-Ply without acknowledging just what handsome devils they are. Classic yet contemporary design combined with the non-tarnishing properties of stainless steel means these pans will come out of the dishwasher looking almost as good as the day you bought them for years to come.
We have incorporated several design aspects in to these pans to make them not only beautiful but dynamically functional. A steep arch in the handle makes the items easier to handle; it keeps the handle away from the heat source; and, allows the pans to nest efficiently in cupboards or drawers. An eyelet where the handle meets the pan body disperses heat to ensure handles don’t get too hot and a hanging loop enables the pans to be elegantly displayed in your kitchen. We also know that larger pans can be very heavy when full. That’s why we have added helper handles to the 18cm and 20cm saucepans, and the 24cm sauté pan.
6 Induction Compatible
Cooking on induction is now possible with ProWare
This is the first complete range we have produced that can be used on an induction hob. The popularity of induction is increasing rapidly due to its wide appeal as a clean, efficient method of cooking.
7 Roast to Perfection
ProWare Stainless Steel Tri-Ply Roasting Pan
In February 2018 we launched something entirely new for us. The latest member of the Stainless Steel Tri-Ply family, our 35cm Roasting Pan has the same three-layer construction as the rest of the range meaning it will work on an induction hob too. This stunning piece makes oven-to-table dishes that much more appealing and it is built to last so will see you through decades of roast potatoes!
We would love to hear from you!
If you think we have missed anything or have any feedback about our Stainless Steel Tri-Ply (or any of our other products), please get in touch.
Comments Off on Non-Stick vs. Stainless Steel – The Test
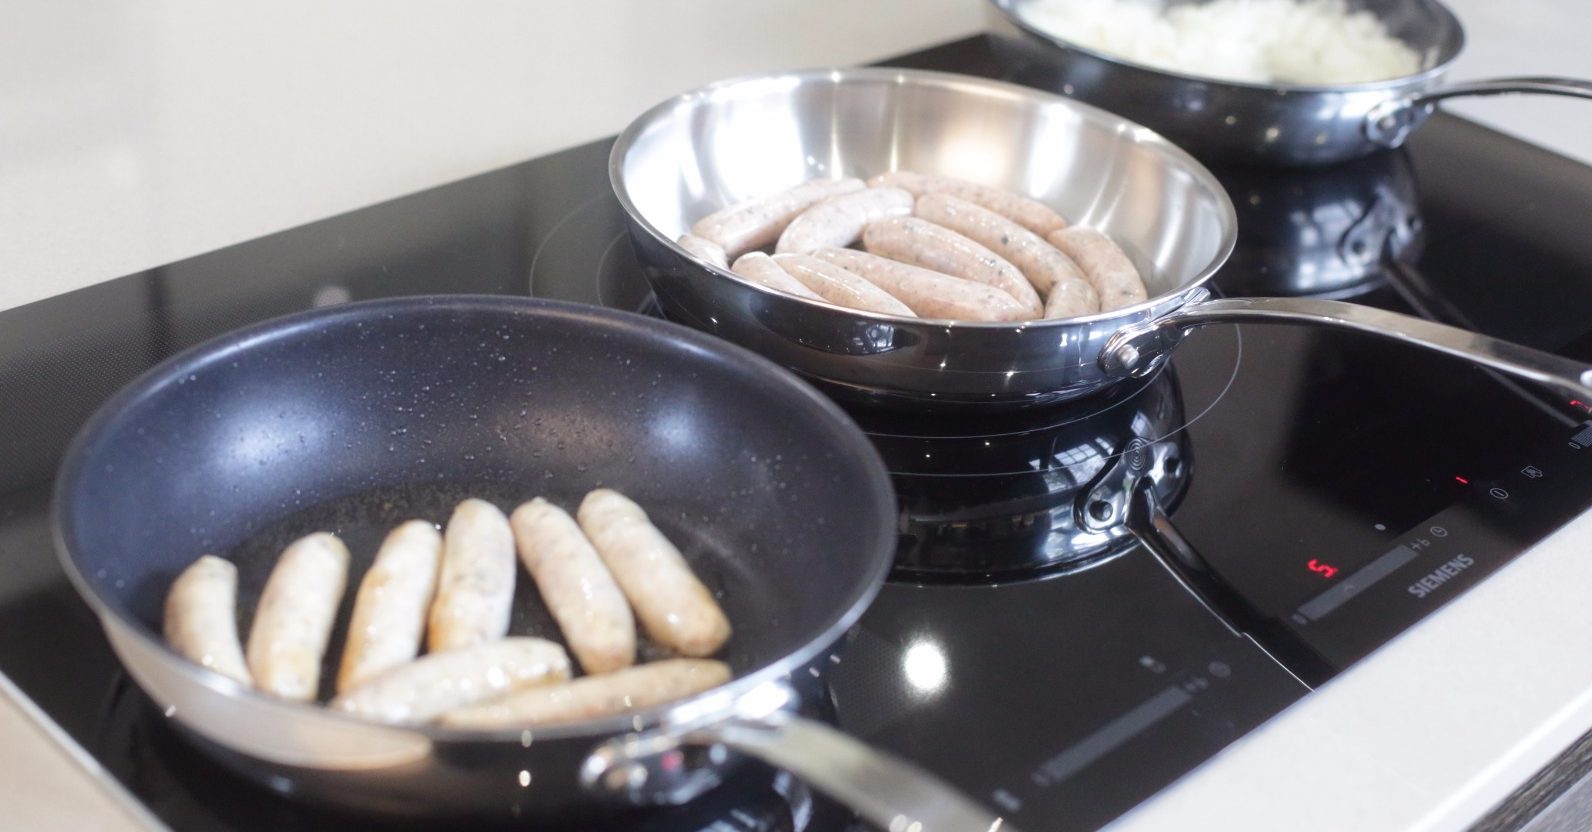
The Test
To compare the results achieved from stainless steel alongside non-stick we have devised simple experiment. Heck sausages are a favourite among ProWare staff. Not only are they a lunchtime saviour for us at The GoodFood Show, their range of meat and vegetarian sausages truly has something for everyone. In recent times, they have also ventured out in burgers, veggie balls and even sauerkraut.
It is with great pride that I can announce that Heck’s Chicken Italia sausages will serve as yardstick in this highly scientific endevour!
NB – Both of our Stainless Steel Tri-Ply frying pans are oven safe, however, the non-stick pan is only safe up to 200C, we therefore decided to exploit the advantage of the former for the purpose of this test and used the non-stick pan on the hob only.
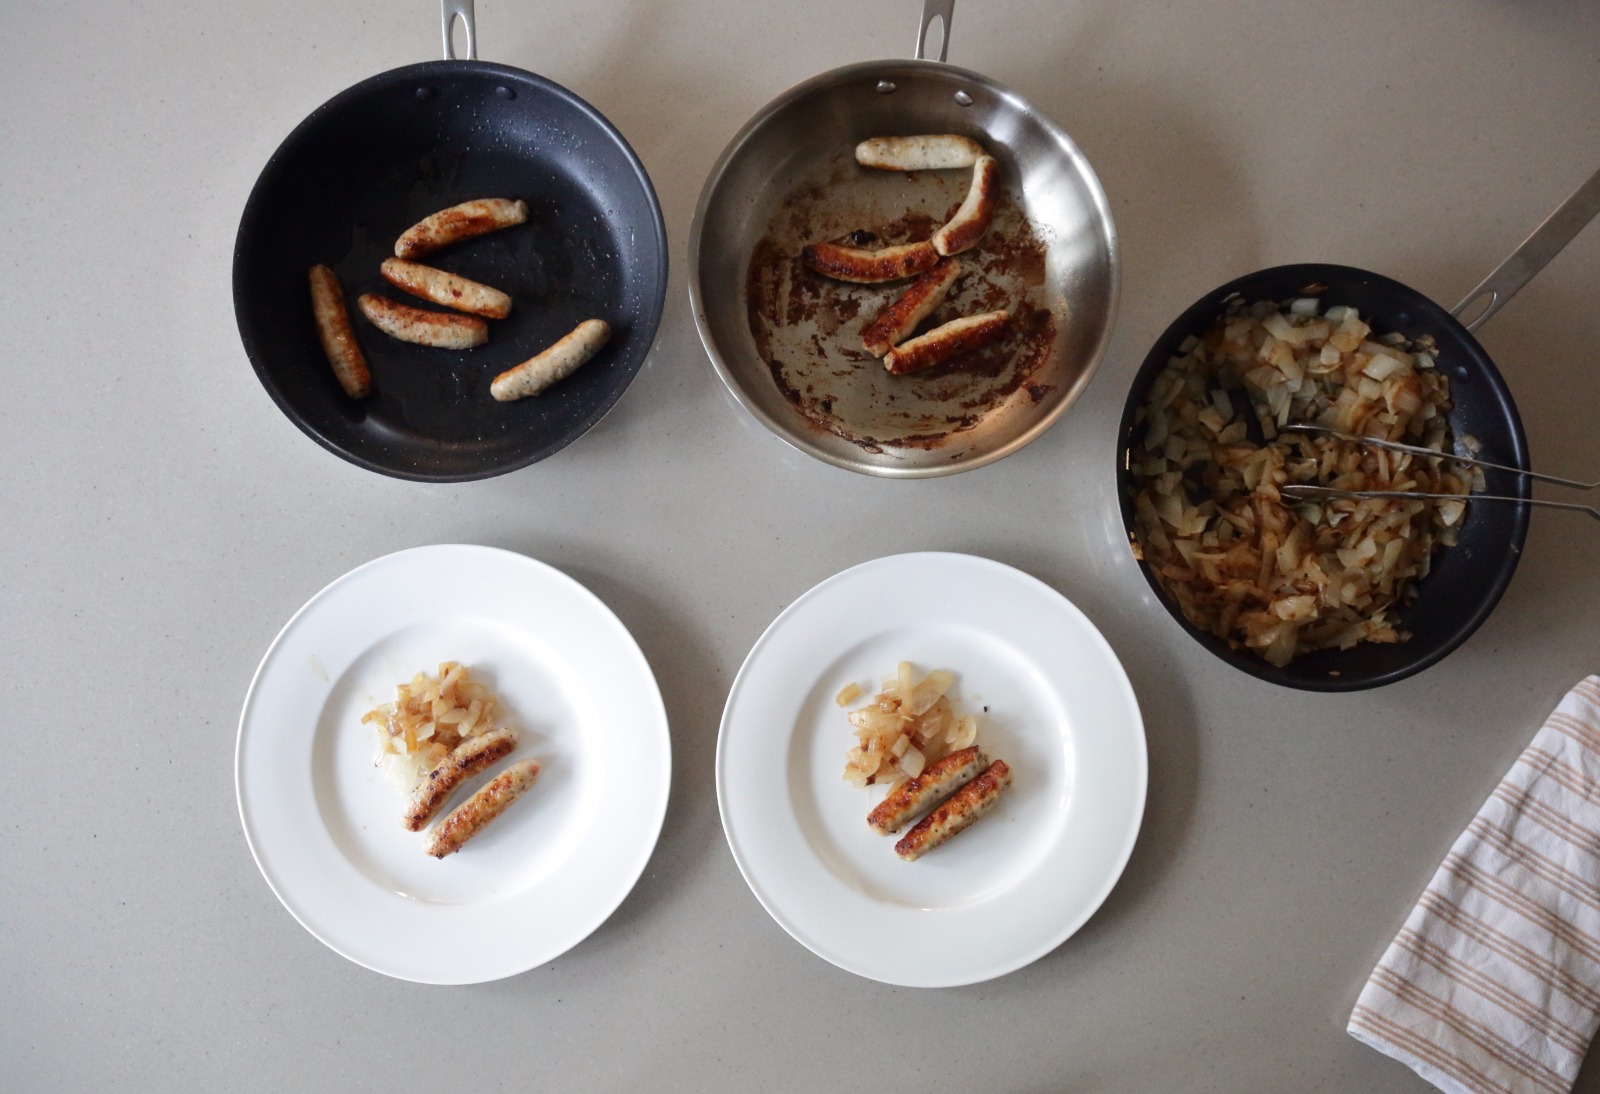
The Results
The end results did show a difference between the two pans but in all fairness it was perhaps not as obvious as we had anticipated. The sausages in the stainless steel pan certainly did brown better which gave them a better caramelised flavour; and should you be making bangers and mash, you could have made a stonking onion gravy with the sticky juices left in pan. It would also be within the realms of possibility to add some Yorkshire pudding batter, sling it in the oven and make a toad in the hole.
In the face of this, the non-stick pan performed admirably and held its own. Whereas the final result may not have been quite as good, for those wanting a speedy clean up and to use less oil, this would be the pan to choose.
Get a free 24cm Non-Stick Copper Base frying pan when you purchase both a 16cm and 20cm copper-base saucepan!